In previous blog post, we discussed about NSX Projects creation and User role assignment. In this blog, we will discuss about Quotas and Groups in depth .
We will cover other NSX projects features like Networking & other NSX configuration for projects in upcoming blogs.
Please refer below list for all blogs related to NSX Projects and VPC.
- NSX-T Multi-Tenancy: Introduction to Projects, VPC, and Tenant Isolation
- NSX Multitenancy : NSX Projects configuration deep dive Part-1
We are using same topology which we used in previous blog. Please refer below section to get more information about topology.
Topology
We will have NSX-T infrastructure with 2 Projects configured Project1 and Project 2 . Each project has 1 Tier-1 router with logical segment attached and 1 VPC configured.
Project1 have user P1-admin with role Project admin and Pv1-admin user with VPC-admin role. Similarly, Project2 have user P2-admin with role Project admin and Pv2-admin user with VPC admin role which are assigned at project and VPC level respectively. Please refer section User roles for more information about Project and VPC users & roles.
Note: In this blog, we will cover only local users instead of LDAP in NSX-T configuration

Figure 1 : NSX Topology
Note: Project creation and user role assignment are already completed in last blog.
Quota in NSX Project
In NSX , Quota defines maximum limit for number of objects of special type that users can create in project. Enterprise admin defines quota in default space for project and one quota configuration can be shared with multiple projects. Projects can also contains one or multiple VPCs inside projects.
Enterprise admin can set quota for following.
- Quota for objects in the project and across all its NSX VPC.
- Quota for objects only in the project.
- Quota for objects only in NSX VPCs across the project.
NSX have validated object limits at system level. Quota limit for any object can’t exceed beyond NSX object limitation. NSX project provides quota limit for objects Networking , Security , Inventory and VPCs .

Figure 2 : NSX Objects for Quota Configuration
Let’s discuss about more details about those 4 objects for which quota can be configured.
Networking: Enterprise admin can define limits for NSX objects which are configurable from networking tab , like Tier-1 gateway , Segment , Segments port , Segment profiles , DNS zone , ND profile , DAD profile , Static route , NAT , IP address blocks ,etc. Maximum Limit configuration for those NSX objects will span to Project, VPC or both ,as per pre-configured in NSX. Please refer below screenshot where limit for tier-1 router will be span for project only.

Figure 3 : NSX Objects for Networking Quota
Security : Enterprise admin can define limits for security objects like Distributed firewall , Gateway firewall , Distributed IDS/IPS rules etc. You can choose whether limits will be for Projects or VPC or for both. Please refer to below screenshot to find more information. You can refer user can choose Distributed firewall rules for Project and it’s VPCs or project only.

Figure 4 : NSX Objects for Security Quota
Inventory : Enterprise admin can set limit for Service , Groups and Context profile from inventory Tab. NSX provide flexibility to span those configurations for projects and VPC. Please refer to below screenshot.

Figure 5 : NSX Object for Inventory Quota
VPCs : Enterprise admin can define limits for objects that are available in VPCs only from VPC tab. NSX provide objects like VPC , Subnet , Static route , NAT rule , E-W firewall rules and policy.
All objects in this tab for VPC only. Please refer to the screenshot below.

Figure 6 : NSX Objects for VPC Quota
Add Quota in NSX
You can add quota configuration from project screen. Login NSX-T UI with Enterprise admin credentials >> click on Manage in default space.
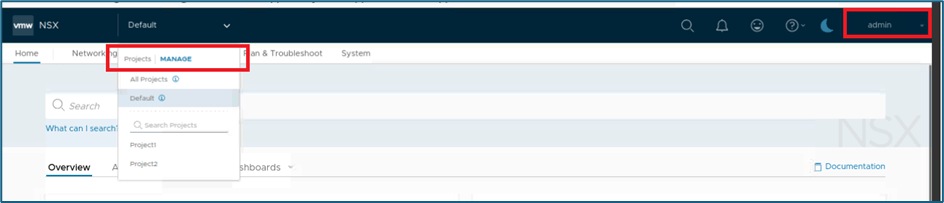
Figure 7 : Click on Manage
New window for Manage Projects will open. Click on Quotas tab next to Projects.

Figure 8 : Click on Quotas
Click on ADD QUOTA to create new Quota limit.

Enter Name for Quota configuration and click on Set to define Limit.
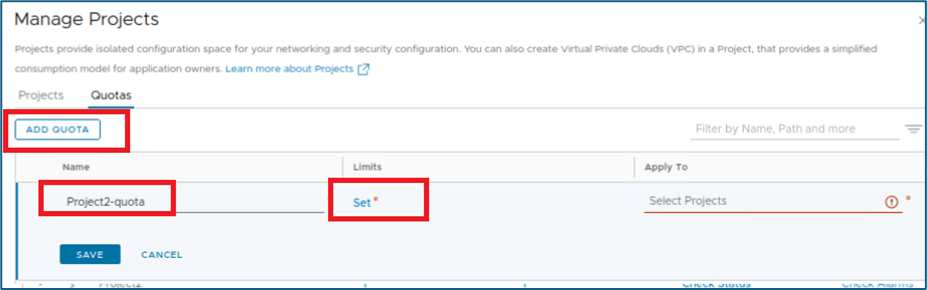
Figure 9 : Define Quota limit Name
New window will open to define limits for networking, security , etc which we discussed in last section. Select appropriate NSX object for which you want to create Quotas limit.
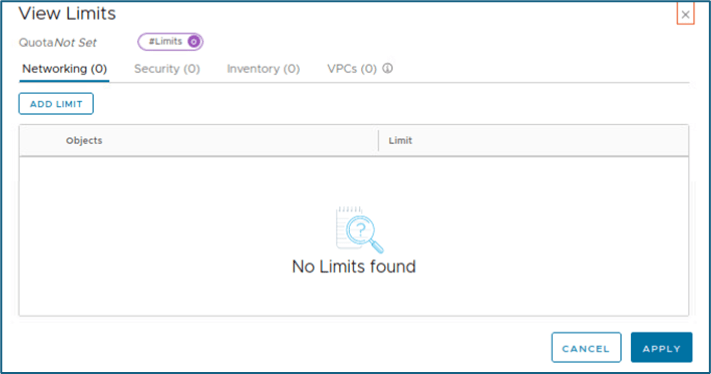
In this example, we will configure quota limit for NSX object tier-1 gateway to 2. Click on Add to apply changes

Figure 10 : Set Quota Limit
After defining limit, you have to select projects where you want to apply those configuration. Select available projects from applied to menu.
You can select multiple projects as scope for this quota configuration. In our example, we have 2 projects configured and we can apply same quota to both projects.
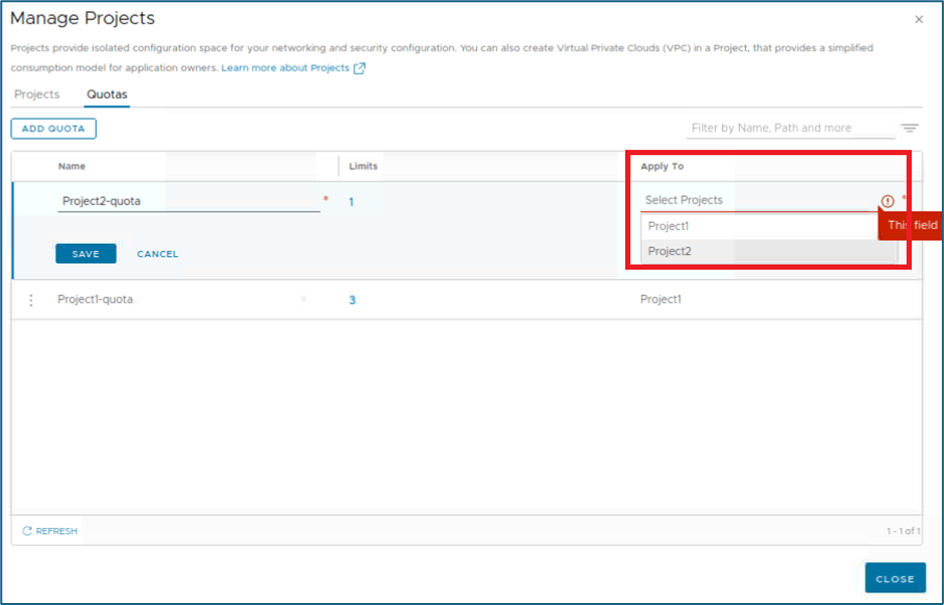
Figure 11 : Define Quotas Scope
Please refer below screenshot. We have added both projects in Quota configuration. Click on SAVE to apply changes.

Figure 12 : Quota limit Creation.
Refer below screenshot , you can validate that project-quota has been assigned to both projects in same screen.

Figure 13 : Quotas Scope validation.
Monitor Quotas
Once you apply quota to project , you can monitor status from project tabs . In our example, we have applied quota to project2. Move to project tab and click on check status under quota status. Please refer to screenshot below.

Figure 14 : Project and Quotas validation
If quota is applied to NSX project , then status will be shown as ok.
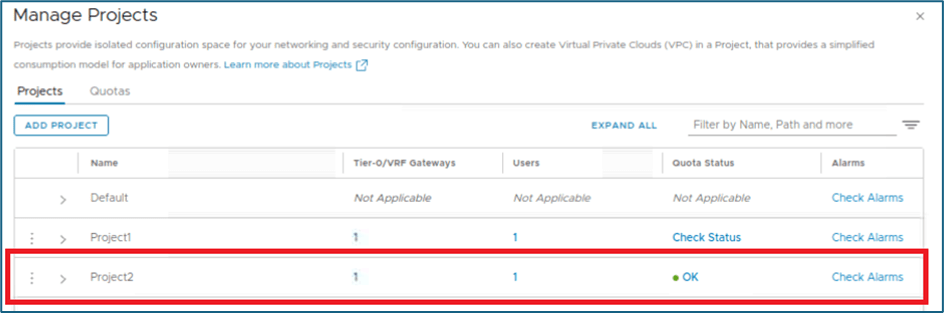
Click on OK to get quotas used status. In our example, we have applied limit only for NSX Object tier-1 gateway which is reflecting in below screenshot with utilization. We didn’t apply any configuration, so utilization is showing 0%.

Figure 15 : Quotas Limit Consumption Validation
All Quota related configurations and monitoring will be done via default space only. At project level there is no option available to manages quotas.
Test Quota limits in NSX Projects
Let’s discuss what happens when we reached to quota limit for NSX objects in project. Please refer below screenshot, We have one quota limit Project1-Quota which is assigned to Project 1 only .
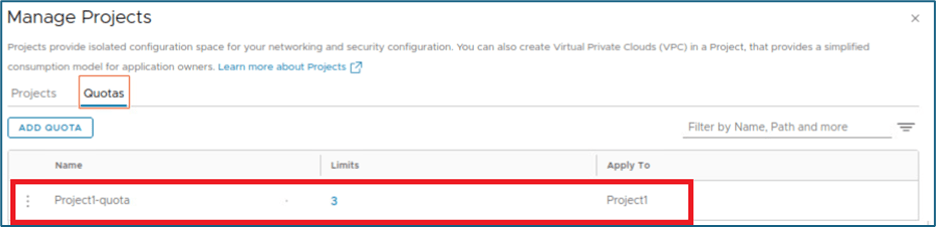
This quota limit is set for NSX Object teir-1 to 2 and we have configured 2 tier-1 gateway already in project1. You can validate quota limit by clicking on check status. Refer below screenshot, NSX is giving message that Quota Limit Reached. Click on Quota Limit Reached to get detail about object.
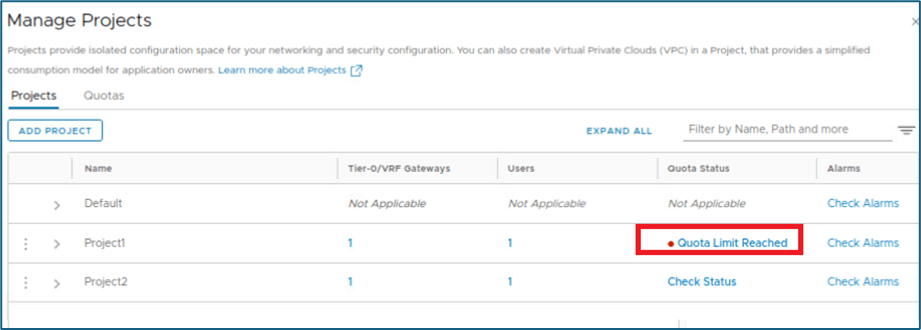
Figure 16 : Quotas limit validation
You can refer below screenshot , Tier-1 gateway limit has been utilized 100%. Now we will login to Project (Project1) with project admin(P1-admin) credentials and try to create new Tier-1 router.

Refer below screenshot, We are logged in Project1 and validated that there are 2 teir-1 (Test1 and Test2) gateways are already configured.

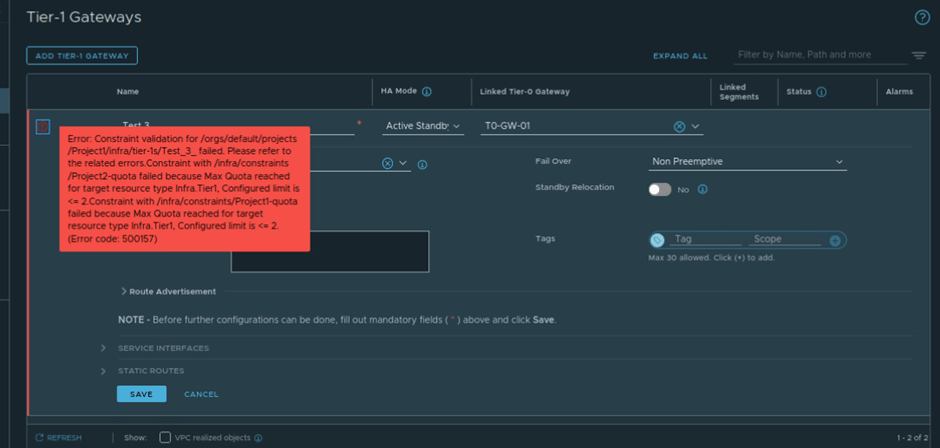
Now we will create new tier-1 gateway with name Test3.
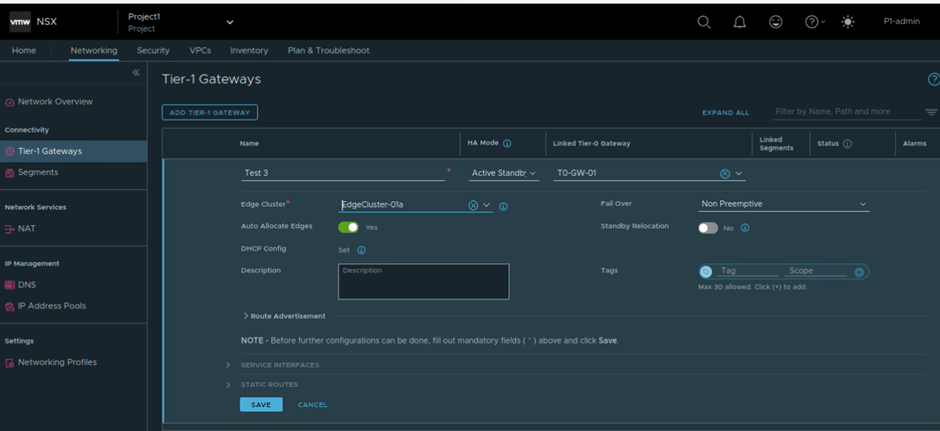
Once you click on save, System will prompt error message of quota limit. In our example, we got error related to tier-1 gateway limit.
This ends our Quota discussion in this blog. Now we will discuss NSX groups in projects.
Groups in NSX Projects
NSX Projects uses Groups to facilitate isolation in data plane. When a project is created, a NSX group representing that project is also created with DFW rules which allows communication inside project but blocking anything else. Project admin can manage their own rules by changing default project rules Those rules will only apply to VMs connected to segments for their project. Group created by system during project creation follows naming conventions: ORG-default-PROJECT-Project name-default.

Figure 17 : Group in NSX-T Projects
Note : Project Groups are not visible/available under Default space. User can login to specific project to validate project specific group. System wide users like admin can view all projects groups from All projects screen.
There are 2 kinds of groups in NSX Default groups and user created.
Default Groups created by system in Projects and user groups are created by Project users.
In our blog, there are 2 projects crated (Project1 and Project2 ). Currently we are logged in via admin user(Enterprise admin) in default space. We can validate that no groups are showing in inventory.
Refer below screenshot, There are 5 groups created but project related default groups are not visible in default space.

Figure 18 : Groups in default space
Now we will move to All Projects screen, here you can validate project specific groups are visible.

Figure 19 : Groups in All project screen
In above screenshot, 2 extra groups (Highlighted) are visible which belongs to projects.
Now we will login NSX-T Manager with Project admin (Pv1-admin) user to validate NSX groups in project(Project1).
In below screenshot, you can validate that we are logged in to NSX project and only default groups is visible. Other groups created in default space are not available in project.

Figure 20 : Default Group in Project
Enterprise admin can also share groups with Projects. Project admin can click on checkbox for shared groups and VPC related objects.
NSX Objects like segment , ports ,virtual machine etc gets added to that default group , when user create in project. In our infrastructure, we have crated one NSX segment Project1-segment. NSX automatically add this segment as member to default group .
Refer below screenshot to validate NSX-T segment in Project1.
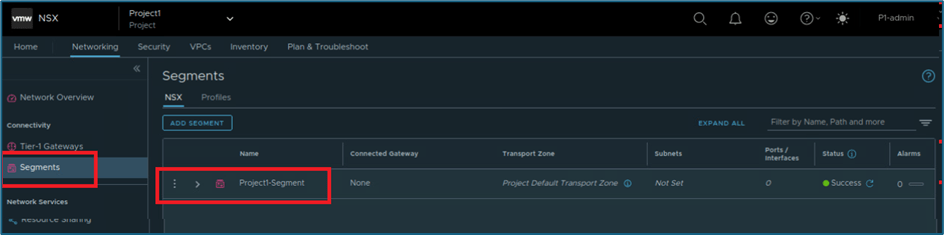
Figure 21: Project NSX Segment
Now validate group by clicking on Inventory >> group

Figure 22 : Project Default group
Click on View Members and click on segments. You will find Project-segment as group member.
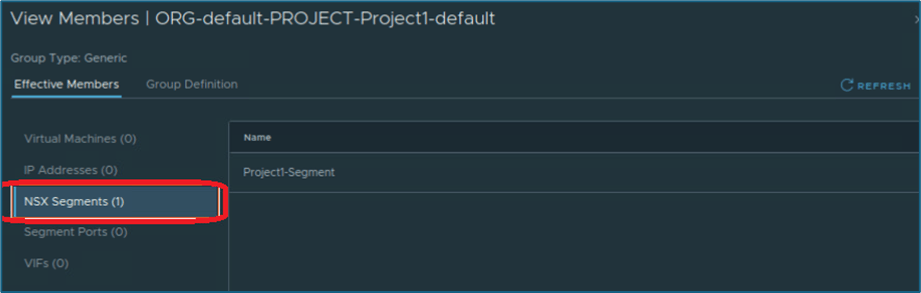
Figure 23 : Default Group Members
User Defined Groups
NSX provides flexibility to create groups to project users. NSX support Generic and IP address only while creating groups.

Figure 24 : Group Types
Generic provides both dynamic and static options to create Groups with NSX objects.
The following NSX objects are supported for adding to dynamic group membership criteria inside a project:
- Virtual Machine
- Segment
- Segment Port
- Group
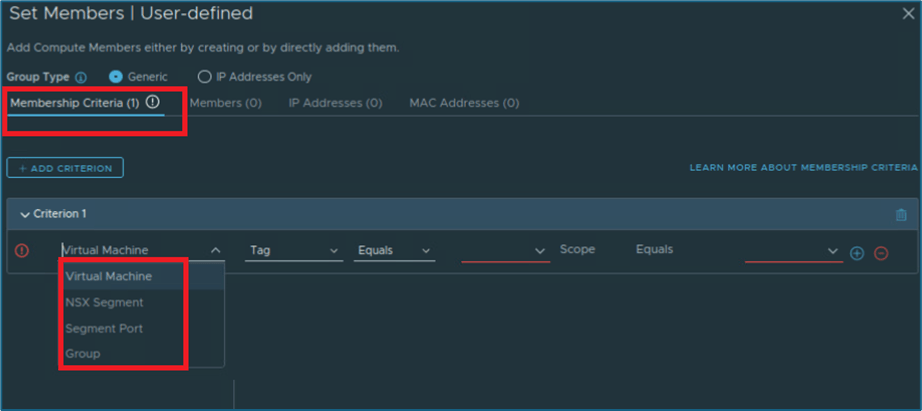
Figure 25 : Dynamic Membership criteria
The following NSX objects are supported for adding statically to a group definition inside a project:
- Segments
- Segment Ports
- VIFs
- Virtual Machines
- Groups

Figure 26 : Static Member Criteria
In our infrastructure, we will create user object Project1-group and assign NSX segment Project-segment as static member. Please follow below steps to create group.
Note: We are creating group in Project (Project1) and we are logged in with Project admin user (P1-admin)
Login to NSX-T UI >> Inventory >> Groups >> ADD GROUP

Figure 27 : Add Group
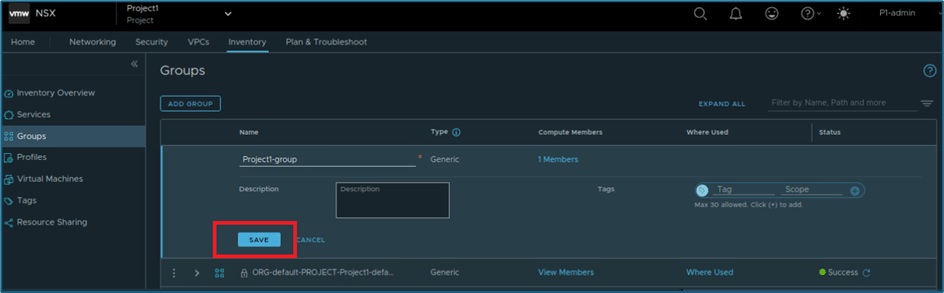
New Window will pop-up. Enter group name Project1-group and click on SET .

Choose Generic and click on Members. Select NSX Segment from the category.

Figure 28 : Add Member to Group
Select NSX Segment which needs to be added as group member. In our case, we have only 1 NSX segment Project-Segment. Click on Apply to save configuration.
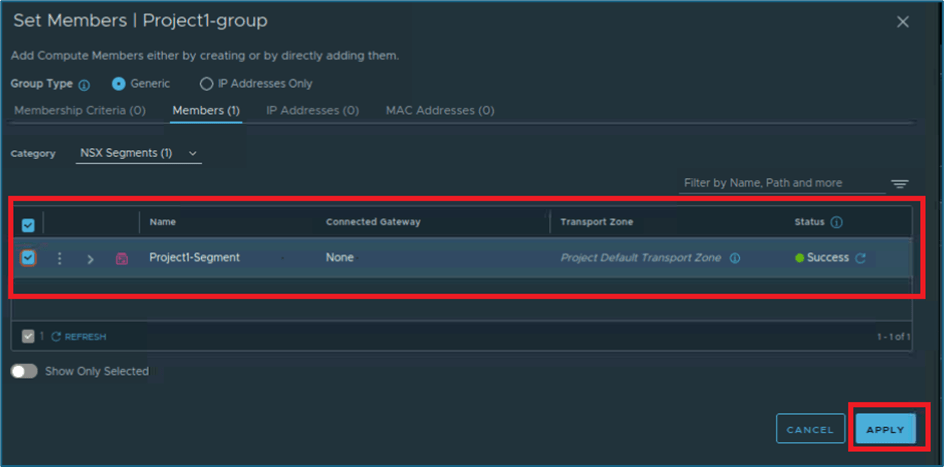
Now click on SAVE to create Group in NSX Project.
You can validate Group member via clicking on view members.
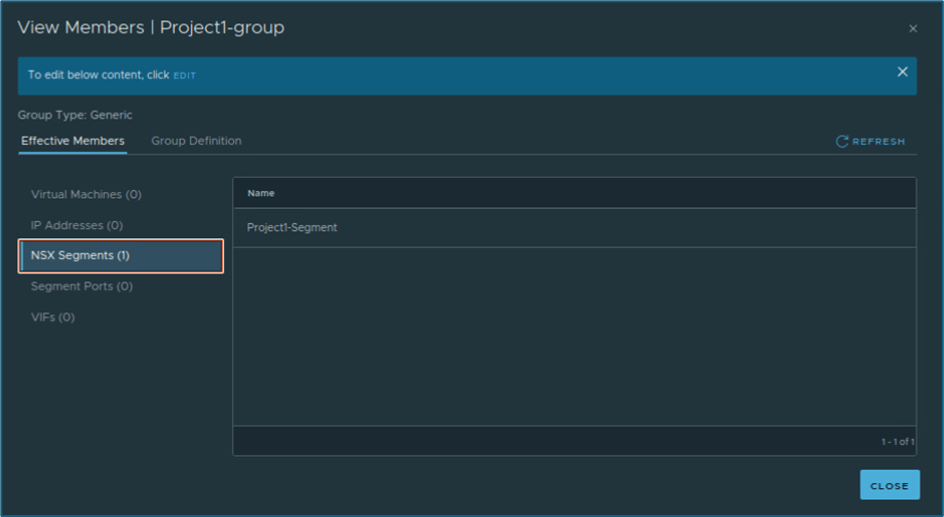
Figure 29 : Group Member validation
This concludes our blog where we discussed about NSX Projects Quotas and Groups in details. We will cover other topics in upcoming blogs.


Leave a reply to NSX Multitenancy : NSX Projects networking configuration (Routing and filtering ) deep dive Part 3 – Welcome to Bytestuffs.com Cancel reply