Welcome back to our NSX project blog series! In our previous posts, we delved into the details of NSX project creation, quotas, and groups. Today, we’ll take an in-depth look at VPCs within NSX projects, covering VPC creation, user roles, network, and security configurations.
For more insights on other NSX project topics, please refer to the links below.
- NSX-T Multi-Tenancy: Introduction to Projects, VPC, and Tenant Isolation
- NSX Multitenancy : NSX Projects configuration deep dive Part-1
- NSX Projects configuration (Quotas and Groups) deep dive Part 2
- NSX Projects networking configuration (Routing & Filtering) deep dive Part 3
VPC Overview
The NSX 4.1.1 update introduced the VPC feature, adding an extra layer of multi-tenancy within projects. The VPC concept in NSX is similar to cloud network VPCs, allowing users to create their own subnets and DFW rules without needing to understand the underlying infrastructure. This feature simplifies the consumption model of networking and security services for end-users, much like a public cloud environment.
Each VPC is associated with a Tier-1 gateway, which is created with the VPC’s name whenever a VPC is established. This Tier-1 gateway connects to the Tier-0 gateway or VRF specified during VPC creation. Subnets within a VPC are overlay segments in the project’s default transport zone.
A VPC serves as a logical container for network and security configurations, supporting three types of subnets (public, private, and isolated) as well as NAT and DFW configurations.
Project admin can assign existing users (Local or LDAP) with VPC admin or specific roles and scope them to one or more VPC
Project admin can share groups with VPC so that VPC users can consume them in their policies. The project admin can set quotas to limit consumptions for specific configuration objects .
Please refer below diagram to get high level understanding of VPC.

Figure 1 : VPC Overview
VPC Subnets
Public Subnets have access to communicate with external world. Public Ips are allocated from External IP block assigned by project admin to VPC while creating VPC. Project inherit this external block configuration from project creation workflow.
Private subnets are created from Private block assigned to VPC. To communicate outside VPC, Private subnet use SNAT configuration where one IP get assigned from public subnet. This SNAT configuration get created automatically for whole Private IP block with 1st IP address of External block.
Isolated subnets don’t communicate with any other subnet (within VPC and outside VPC). VPC admin creates isolated subnets and doesn’t require any IP block like public & private subnet.
Please refer below VPC logical diagram for VPC logical network & security connectivity.

Figure 2 : VPC Logical View
Topology
In this blog, we will use the topology shown in the diagram below. Here, an NSX Project (Project1) has been created, with the user P1-admin assigned the role of Project admin. We will deploy a VPC (Project1-VPC) with an existing Tier-0 router, an external subnet (10.90.0.0/24) for NAT and Public Subnet, a Private IP block (10.10.0.0/24), and an isolated subnet (10.11.0.0/24). Additionally, we will assign local users P1n-admin (Network admin) and P1s-admin (Security admin) to test and validate user role assignments.
Note: In this blog, we will cover only local users instead of LDAP in NSX-T configuration
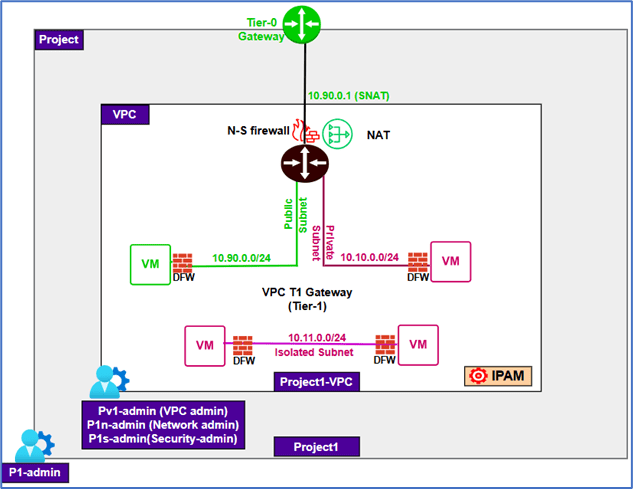
Figure 3 : Topology
Configuration
This blog will cover VPC creation and User role section and other configuration will be covered in next blog. Let jump into NSX configuration and validate configuration.
Note : We have already configured Project1 and assign user:P1-admin to project with User role: Project admin and external subnet:P1-ext (10.90.0.0/24). VPC will inherit external subnet from this configuration while VPC configuration workflow.
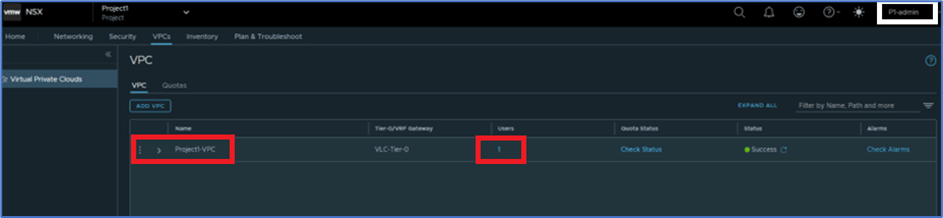
We have logged into NSX-T with User:P1-admin which is assigned with Project1 , and validated that there is no VPC configured. Refer below screenshot to find VPC and User details.

Figure 4 : VPC status Validation
Navigate to VPCs Tab and then click at ADD VPC to create new VPC . After this new window will popup.

Figure 5 : Click on ADD VPC
Provide VPC name (Project1-VPC) , Select Tier-0 gateway from list (Inherit T0 router from Project) , expand IP assignment tab and validate that VPC have external subnet (inherit from project) and private IPv4 block is not created.
Click at Create New in Private IPv4 block to add private block to VPC.
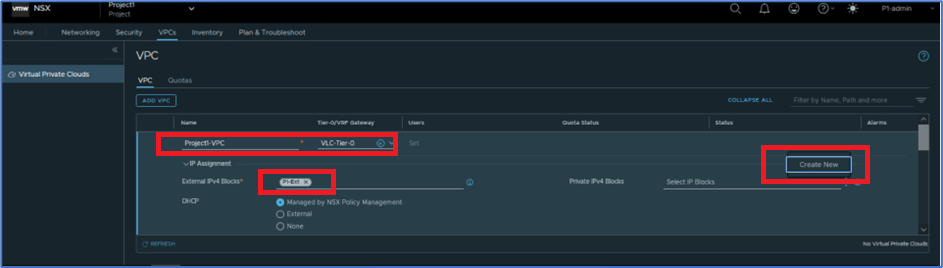
Figure 6 : Add VPC configuration
New window will popup and add information IPV4 block name (P1-Private1) , CIDR (10.10.0.0/24) and scroll down and click on SAVE.
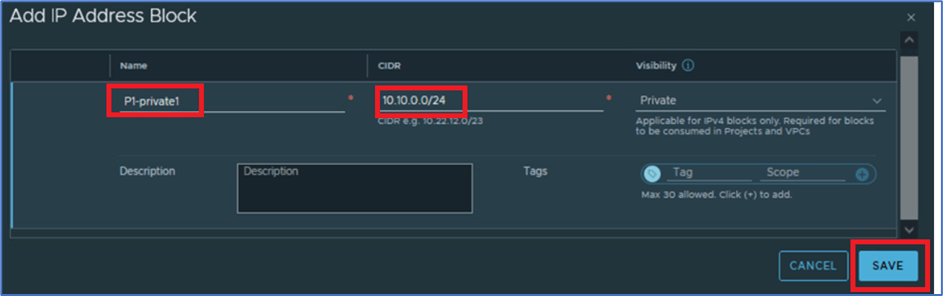
Figure 7 : Create IPv4 Private Block
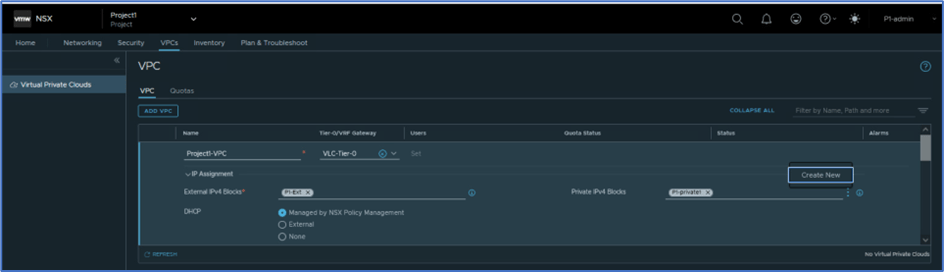
You can assign more than 1 Private IP block to VPC. To add more click on 3 Vertical icon and then click at Create New.
Note: In this blog, we will continue with single IPv4 block.
Scroll down on same window and you will get option to add DNS server IP , and here you can add DNS service , N-S Service (North-south Service like Firewall , NAT) , Default NAT for private IP blocks , Edge cluster where N-S services will be enabled.
You can also enable Load balancer feature to leverage inside VPC.
Note: We have added Edge cluster in our blog.
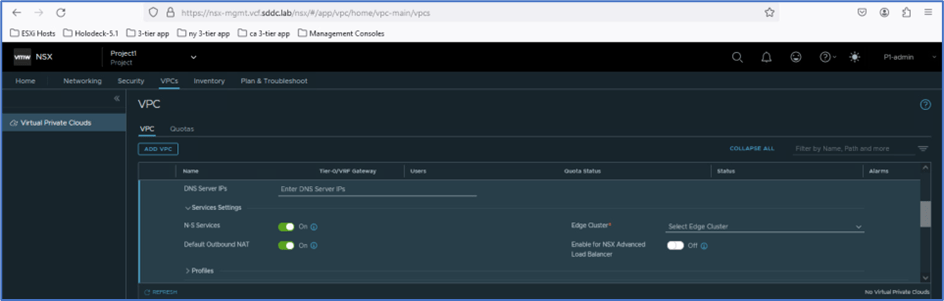
Figure 8 : N-S Services for VPC
Scroll down same screen for VPC creation and you can choose for Profiles for VPC subnet logical segments. In this blog we go with default profiles.

Figure 9 : Logical segments profiles
Scroll down and click on Save to create VPC.
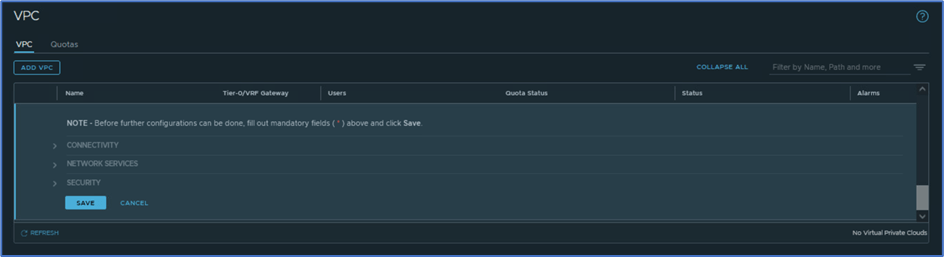
System will take couple of seconds to create VPC and You can add more setting by clicking on Yes , like add VPC users.
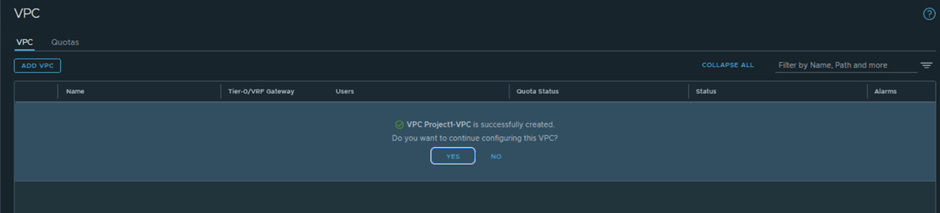
Now you can validate that VPC has been added. You can validate status , alarm and other configuration like attached Tier-0. Please refer below screenshot to find more details.

Note: While NSX VPC creation workflow , system create dedicated NSX Tier-1 gateway for VPC. VPC subnets Public and Private gets connected with that tier-1 gateway , which is further connected with tier-0 router.
This VPC dedicated Tier-1 router is not visible to VPC users as VPC provide self service portal to Application users to create NSX network and security without knowing underlay NSX infrastructure.
To validate VPC Tier-1 gateway , Login NSX manager with Project admin user (P1-admin) and navigate to Networking >> Tier-1 gateway . By default , you will not get any VPC router details . You have click on VPC related objects .
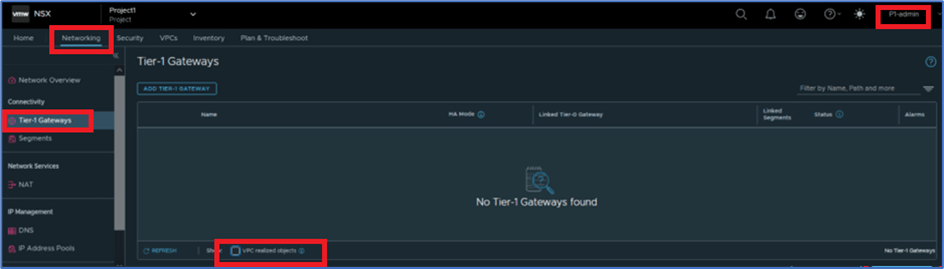
Figure 10 : VPC related objects
Now validated that VPC dedicated Tier-1 gateway is reflecting in NSX Manager UI , which is connected NSX Tier-0 router and deployed in Active-Standby Mode.
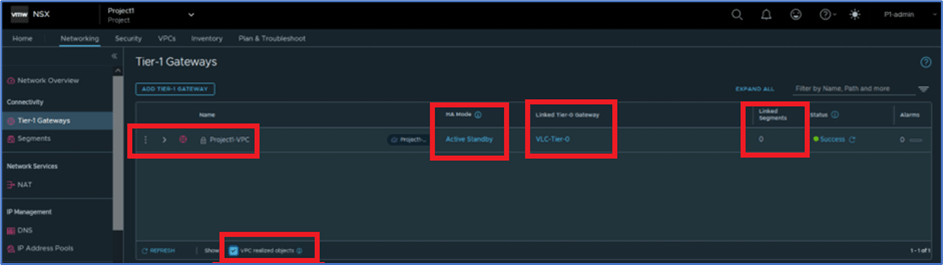
Figure 11 : VPC Tier-1 Gateway
Currently Linked Segments is showing zero as there is no NSX VPC subnets are created
Navigate to NSX>>Networking>> Segments and validate that there is no Logical segment is created. Once VPC users or admin start creating VPC subnets, logical segments will be created .
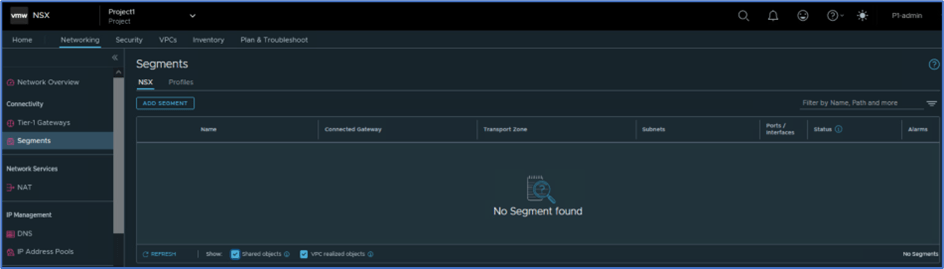
Figure 12 : NSX Logical segment
NAT Rule for Private IPv4 block
While creating Private IPv4 block in VPC and if you enable Default outbound SNAT rule, System create outbound SNAT rule private IPv4 block and choose one IP from External subnet. In our example we have created Private IPv4 block: 10.10.0.0/24 and external subnet 10.90.0.0/24.
Navigate to NSX>>Networking>>NAT and select Show VPC related objects to get VPC related Tier-1 gateway. You can validate auto SNAT rule information like below where 10.90.0.0 is used for outbound SNAT IP.
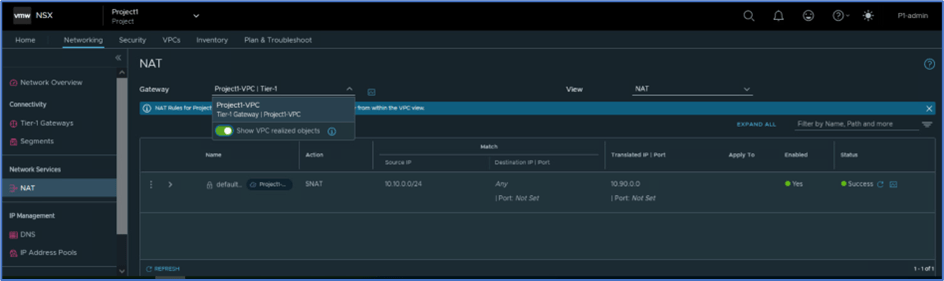
Figure 13 : Outbound SNAT
Now we will validate NAT rule in NSX edge VM CLI and validate that router is receiving routes to establish North-South connectivity for Private IP.
Login to NSX Edge VM and find VRF ID for Tier-0 gateway Service router , with command get logical-routers. In our example VRF id was 2 and then type command: VRF 2 to get login to Service router .
Run command get route | find t1 to filter route from tier-1 gateway only. In our example , we got below output(Refer screenshot). Tier-0 gateway is receiving 10.90.0.0/32 as t1n routes , which means Tier-1 gateway NAT routes.
Note : IP 10.90.0.0/32 is used for SNAT at VPC gateway which we captured earlier.

Figure 14 : NAT rule configuration at Edge VM
Also at edge router , one SR for VPC router has been added. DR components gets added after VPC subnet creation.

Assign user roles to VPC
In this section, we will discuss and configure user role assignation to local users in VPC. By default, Project-admin and other user roles don’t have access to assign role assignation for VPC configuration. Only Enterprise administrator have access to assign users and roles to VPC. Enterprise admin can provide access to pre-define user role like project-admin, user-admin to assign user & role to VPC. In VPC you can assign the following roles to users.
- VPC Admin
- Security Admin
- Network Admin
- Security Operator
- Network Operator
Note: VPC admin have full access to network and security objects inside an NSX VPC. The other users’ roles have limited access like Network admin can’t add security rules but can configure subnet configuration.
Refer below screenshot, we have added VPC but there is no user assigned to it. Now we will assign users to VPC from Enterprise Admin user and later in this section we will provide access to Project-admin and other user to add Users and roles in NSX VPC.

Figure 15 : VPC review
Add user from Enterprise admin user
Login to NSX Manager with admin user which have enterprise admin access. Click on default space and then click on Manage project. Click on 3 vertical dots and click on Edit and then click on user tab
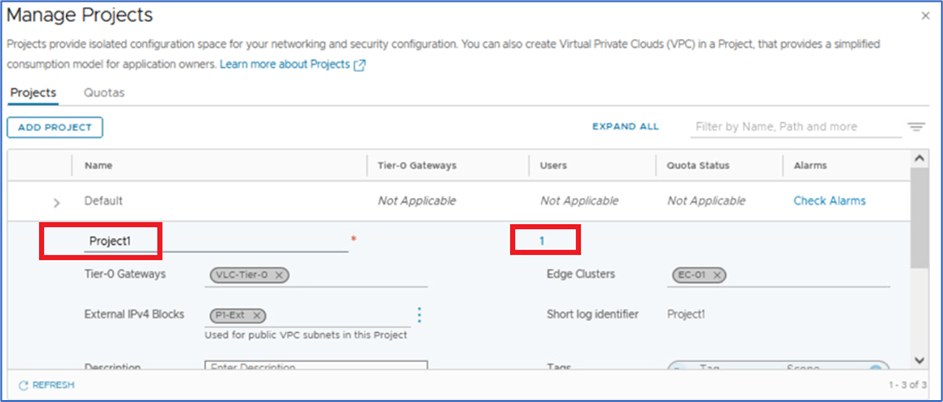
Figure 16 : Click on User Tab
New window will pop-up and Click on ADD ROLE ASSIGNMENT and select source of user like Local user or any other identity.

Enter User name and then click on SET under Role/Scope. Refer below screenshot, we are going to add Pv1-admin (Local User) and will assign VPC-admin role.
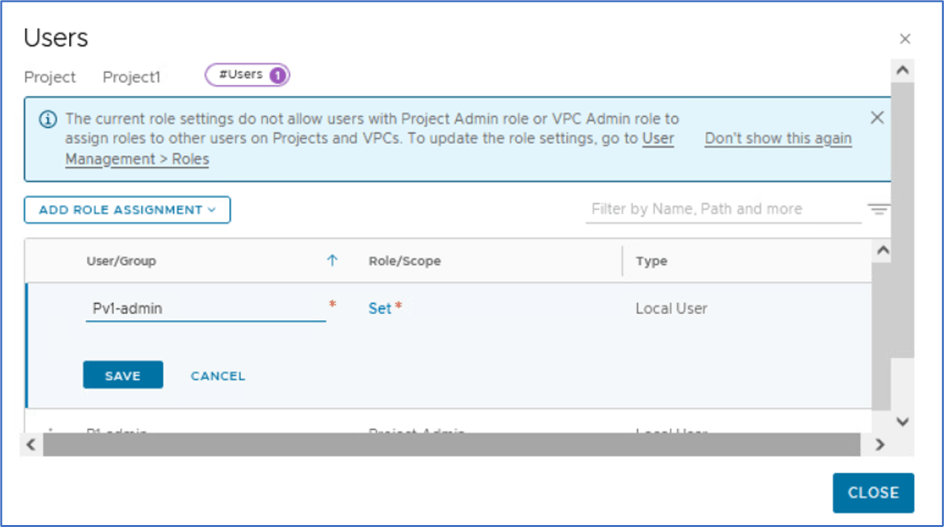
Figure 17 : User & Role assignment
Click on ADD ROLE and choose appropriate role which needs to be added. In our scenario, we will choose VPC admin.
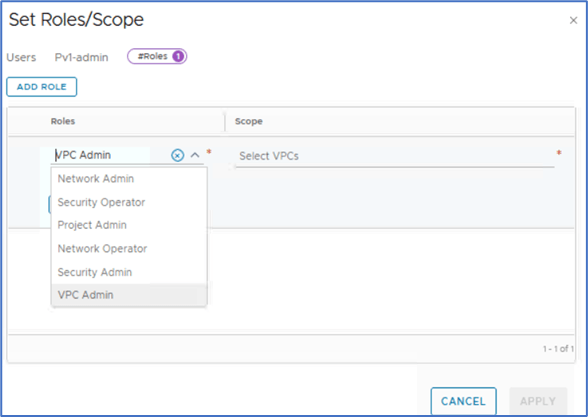
Figure 18 : VPC User role
Now we will select Scope where we will select VPC for this role. In our example, We will choose Project1-VPC.
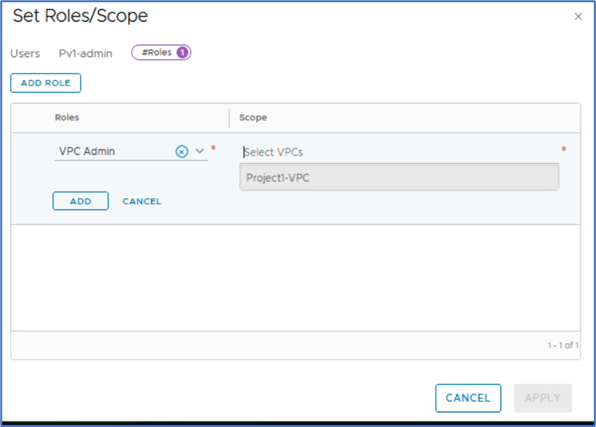
Figure 19 : Select Scope for VPC user
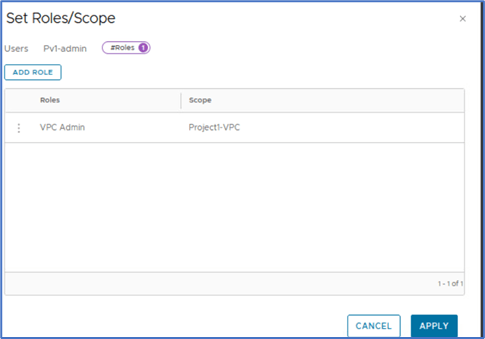
Click on APPLY to apply configuration.
Click on save

Click on close Editing to apply changes.

Now Login to NSX manager with Project admin user: P1-admin to validate that User: Pv1-admin has been added to VPC with user role VPC admin.
Click on 1 under USERS tab and validate User & role details .
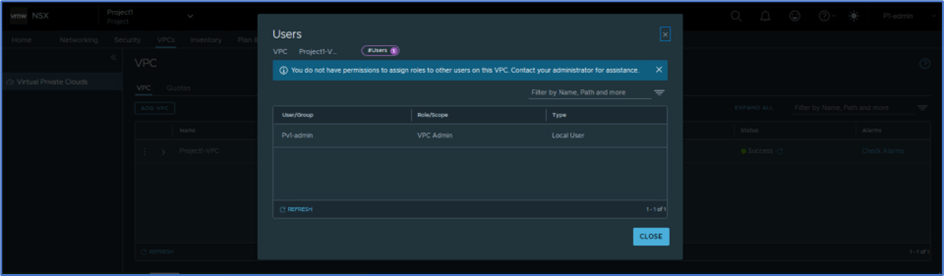
Logout NSX manager from User:P1-admin and login back with User:Pv1-admin to validate configuration.
Refer below screenshot, We have logged in with VPC admin. VPC users get access for VPC only where they can apply Network and security configuration like Add Subnet , Firewall rules , NAT , etc. VPC Portal works like self-service portal for VPC users , equitant to public cloud portal.
Refer below screenshot, We have logged in with Pv1-admin which is mapped with one VPC and project Project1.
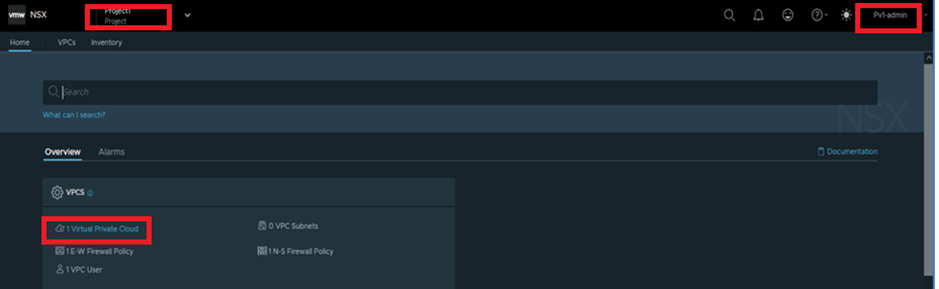
Figure 20 : VPC Portal
Now we will discuss another option where we will provide access to User role Project admin and VPC admin to add users to VPC. Later we will add users P1n-admin and P1s-admin with role Network admin and Security admin respectively in VPC.
To provide access to Other users (Project and VPC admin) , login NSX manager with Enterprise admin. Navigate to System >> Setting >> User Management >> Roles In our example, We will apply changes for Project admin role and then assign User:P1n-admin with user role Network admin to VPC.

Click on 3 Vertical dots and then click on Allow Role Assignments
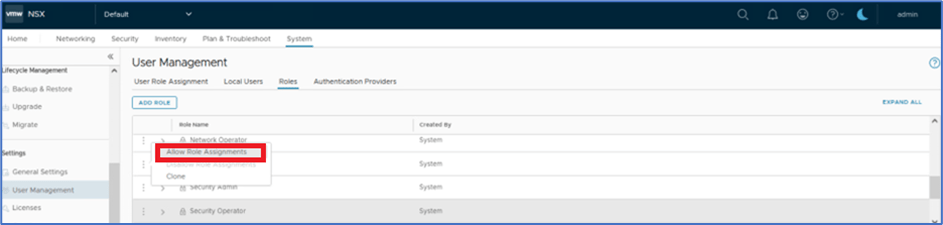
Note: Please apply above configuration to User role:VPC admin . We will add P1s-admin user(Local) to VPC from VPC-admin user role.
Now login to NSX manager with User:P1-admin(Project admin) and click on VPC and click on User TAB.

New window will popup and here click on ADD ROLE ASSIGNMENTS and then select user source (LDAP,Local).
We will add Local user P1n-admin and role Network admin .
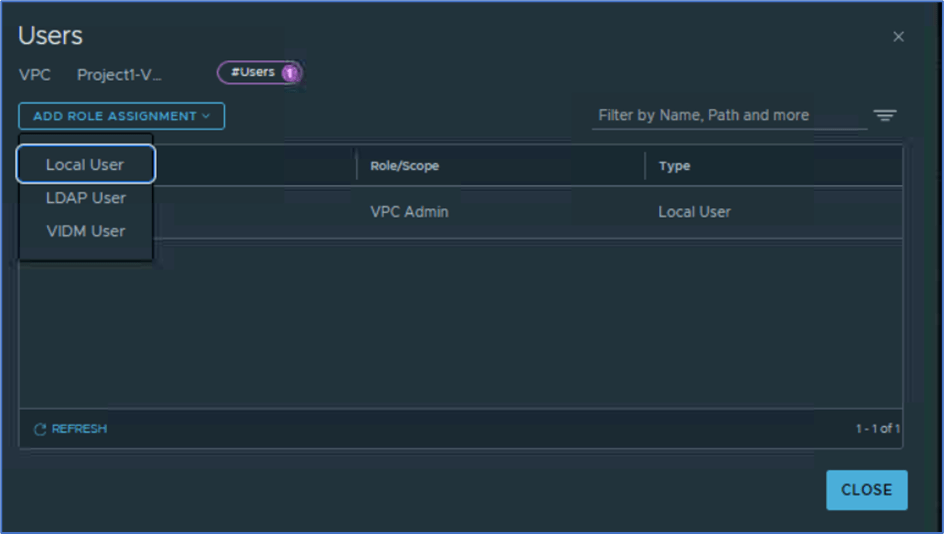
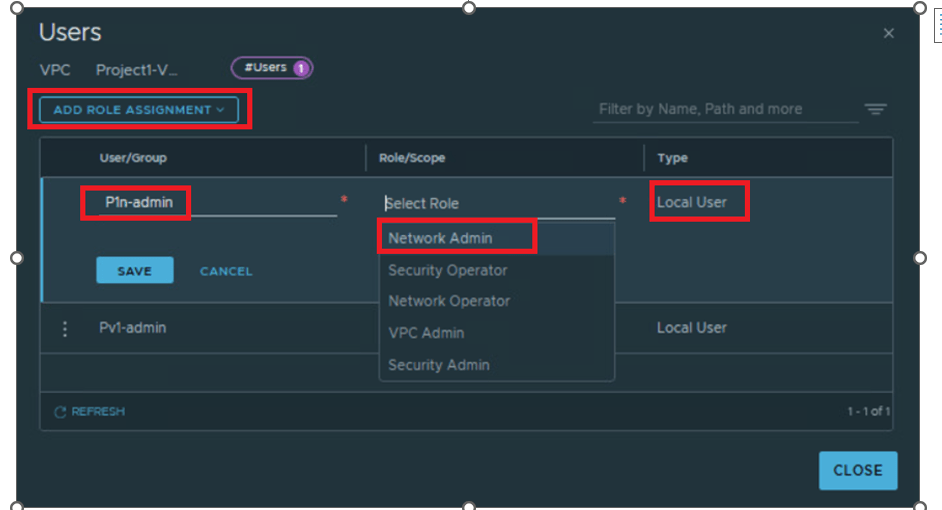
Figure 21 : Add user to VPC
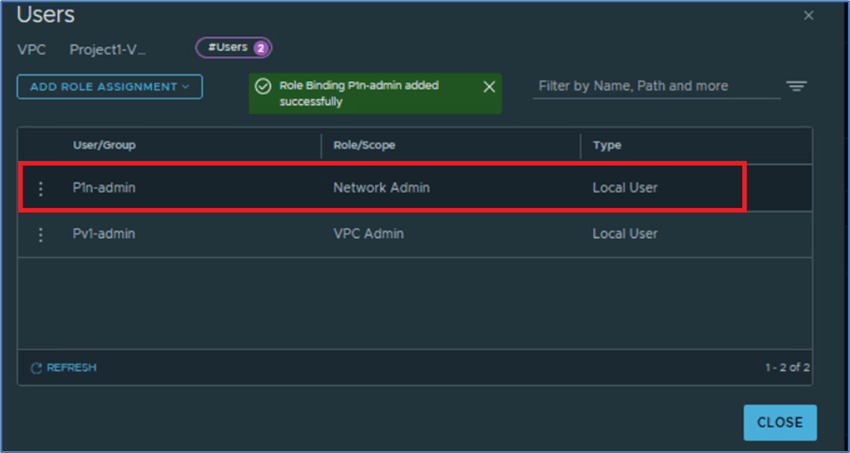
Validate that User has been added to VPC.
Now we will login with User:Pv1-admin with user role VPC admin to add user:P1s-admin with user role security admin role.
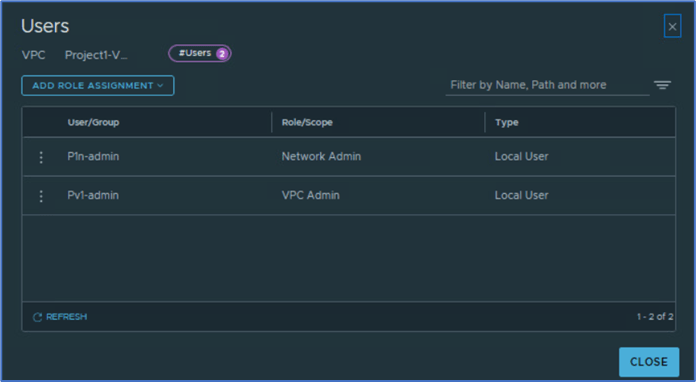
Login to NSX Manager with Pv1-admin and click on VPC and then click on User .

Validate that users P1-admin and Pv1-admin is already added. Click on ADD ROLE ASSIGNMENT and select Local user.
Add User name P1s-admin and select Security admin role. Click on SAVE to apply changes.


Figure 22: User Validation
Validation
In this section, We will login with recently added users P1n-admin and P1s-admin with user role network admin and security admin respectively and validate User role access.
We will login with User:P1n-admin and will validate that User is not have access to apply security rules.
Refer below screenshot, we have logged in with P1n-admin user.
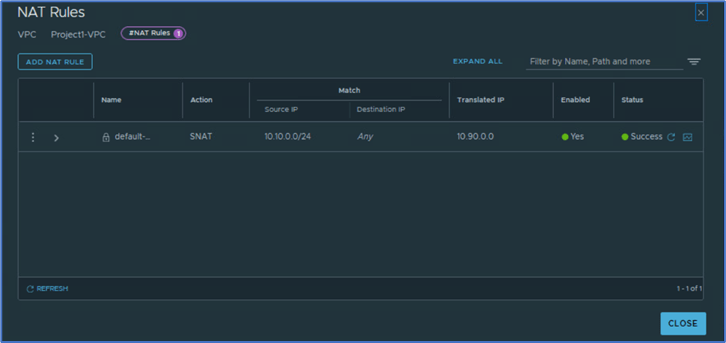
Refer below screenshot and validate that user have access to apply NAT rules.
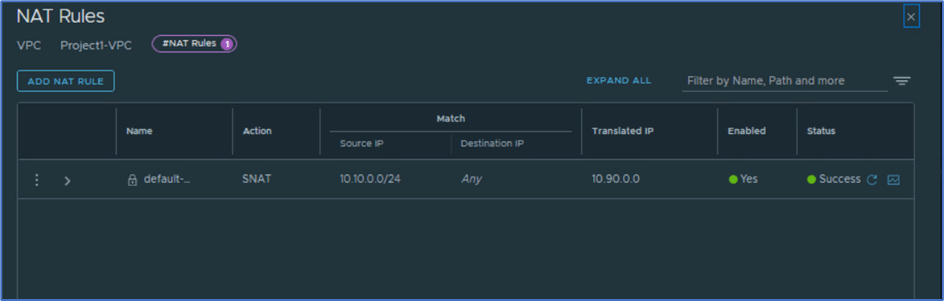
Figure 23: NAT rules
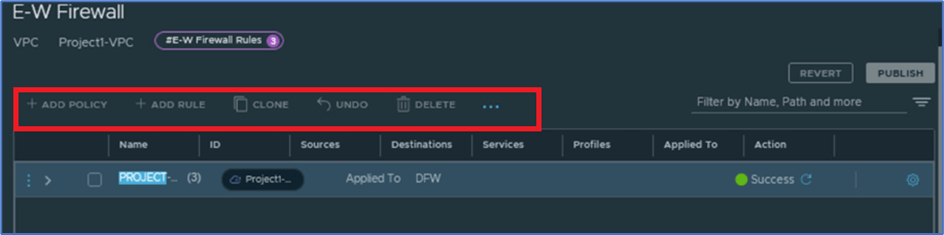
Click on DFW under Security Tab and validate that User:P1n-admin have access to view rules but don’t have permission to add policy and rules.
Now we will login with User:P1s-admin with user role Security admin to validate that user can apply NAT and Security rules but don’t have access to add subnets.
Refer below screenshot , we have logged in with User:P1s-admin .
Click on Network services and then NAT to validate that user have access to add NAT rules.
Click on Security and DFW rules and validate that User:P1s-admin have access to apply security rules.

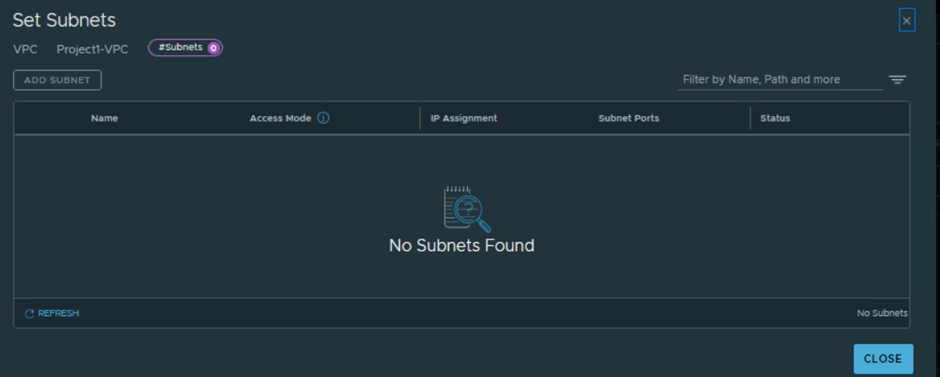
Click on Connectivity TAB and then click on ADD Subnet . Valiate that Security admin User don’t have access to ADD Subnet .
Services portal for VPC users
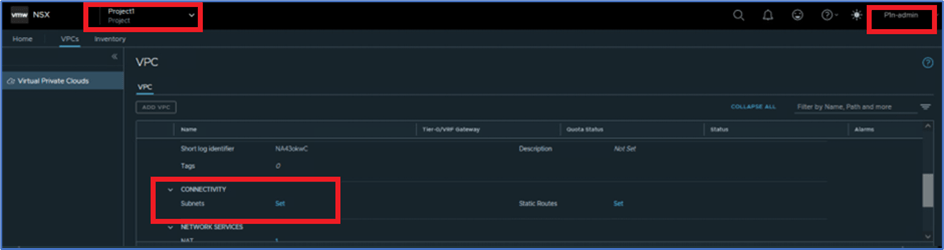
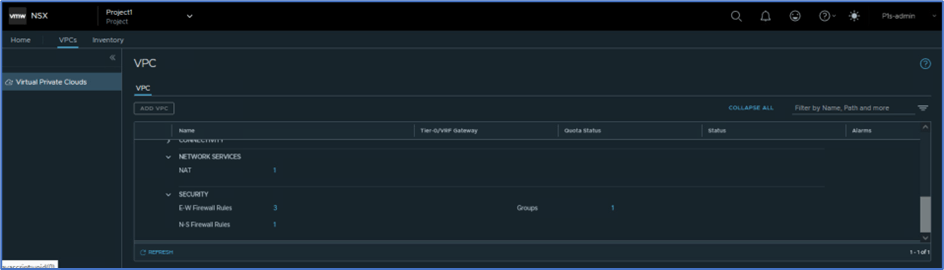
In this section we will discuss and explore services which VPC users can leverage for their application. Refer below screenshot , we get 3 options : Connectivity , Network services and Security.
User can apply Subnets and Static routes in connectivity Tab. NAT configuration is available under Network services and Groups, DFW and Gateway firewall rules will be added in Security tab.
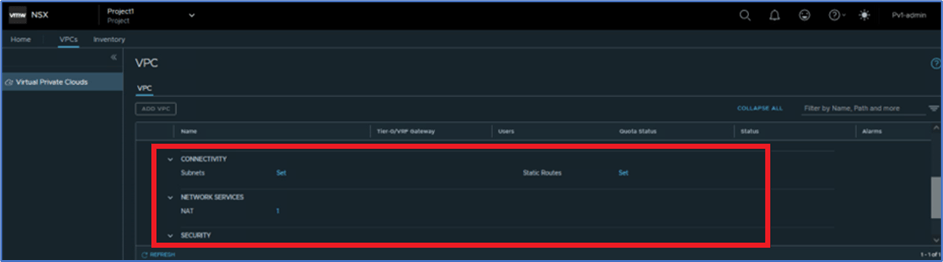
Figure 24: Network and Connectivity
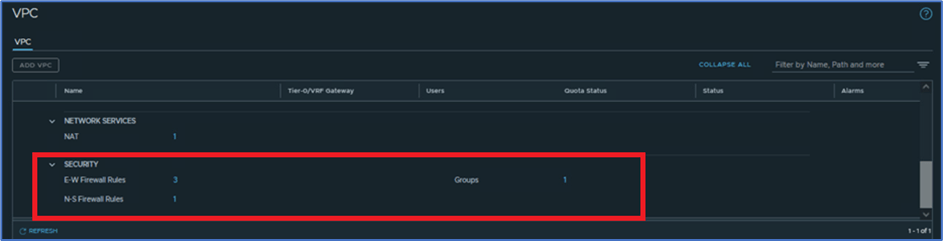
Figure 25 : Security Services
Summary
In this blog , we have discussed about NSX VPC and user roles in depth. In next blog we will discuss about Services in details like Add subnet m firewall rules , quotas , etc in detail.


Leave a comment