Welcome back to NSX project blog series, In last 2 blog posts we have discussed about NSX Project creation , quotas and Groups in details. In this blog, we will do deep dive into networking for NSX projects focusing on Routing and route filtering .
In this blog , we will start by discussing User roles assignment in the first section , followed by networking and filtering in project.
Please refer below links for another NSX Projects blogs.
- NSX-T Multi-Tenancy: Introduction to Projects, VPC, and Tenant Isolation
- NSX Multitenancy : NSX Projects configuration deep dive Part-1
- NSX Projects configuration (Quotas and Groups) deep dive Part 2
Topology
We will have NSX-T infrastructure with 2 Projects configured Project1 and Project 2 . Each project has 1 Tier-1 router with logical segment attached.
In Project1, the user P1-admin will have Project admin role while the user Pv1-admin will have VPC-admin role. Similarly, In Project2, the user P2-admin will be assigned the Project admin role, and the user Pv2-admin will have the VPC admin role which are assigned at project and VPC level respectively.
Note: This blog will focus solely on local users in the NSX-T configuration, excluding LDAP.
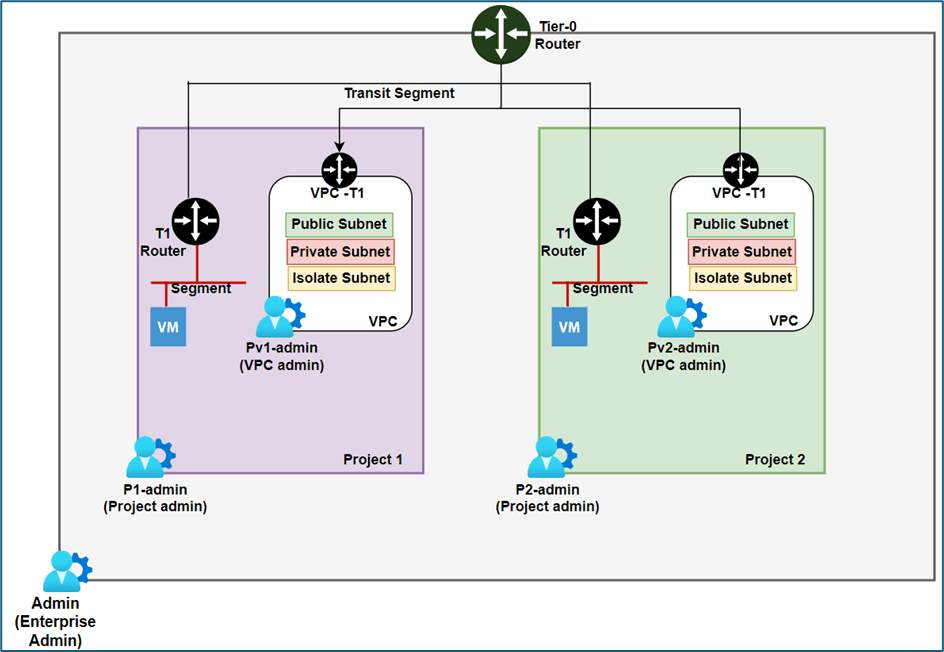
Figure 1 : NSX Project Topology
Please refer below diagram for subnet details. Project1 will be hosting subnet 10.10.0.0/24 and Project 2 will be hosting subnet 10.11.0.0/24.
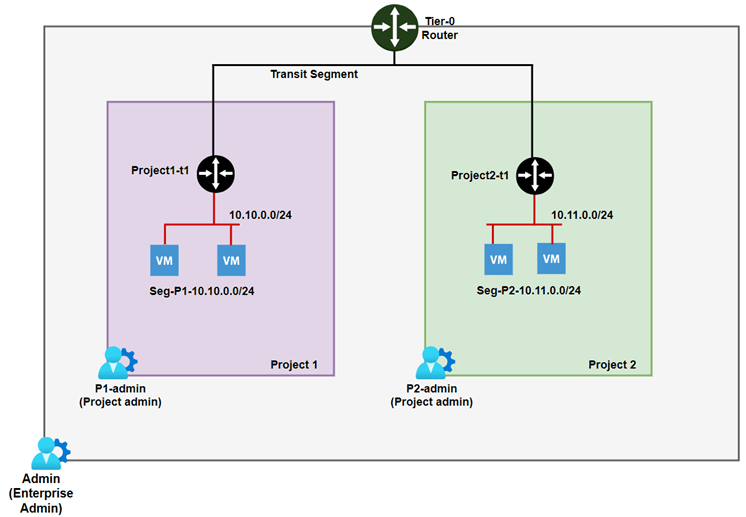
Figure 2 : Project Subnet information
Assigning roles to users
In NSX, You can assign users to project either from project manage screen or from user management . We have 2 users P1-admin and P2-admin ,which will be assigned to projects Project1 and project 2 respectively with project-admin role. Refer below screenshot, both users have auditor role only and in sub-sequent steps we will assign those users to projects.
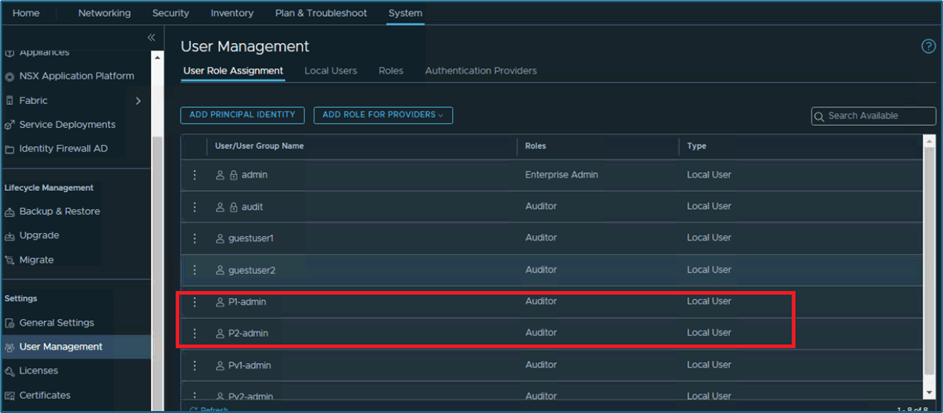
Figure 3 : Local User roles assignments
Assign User to project from user management screen
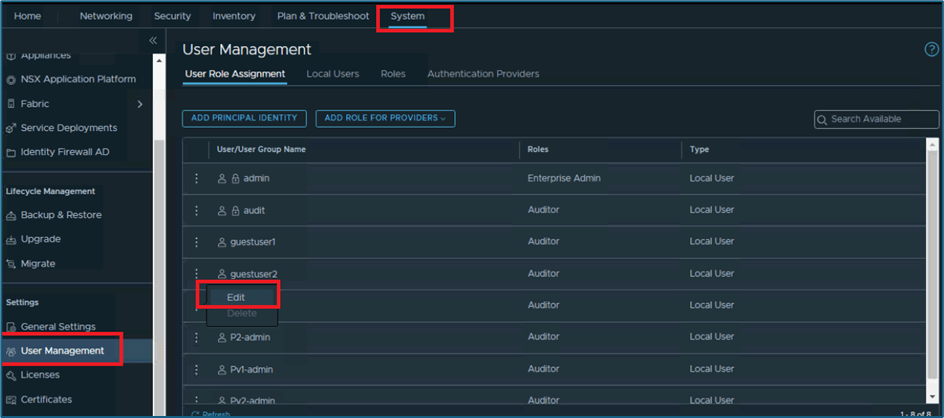
We will assign P1-admin user to project1 from user management screen. Please follow below steps .
Login to NSX-T Manager >> System >> User management .
Click on 3 vertical dots on user and click on Edit
Click on Roles

Delete other roles, if assigned to that user . Click on ADD ROLE to add assign roles. Select Project admin from list and then click on SET under scope to select project .
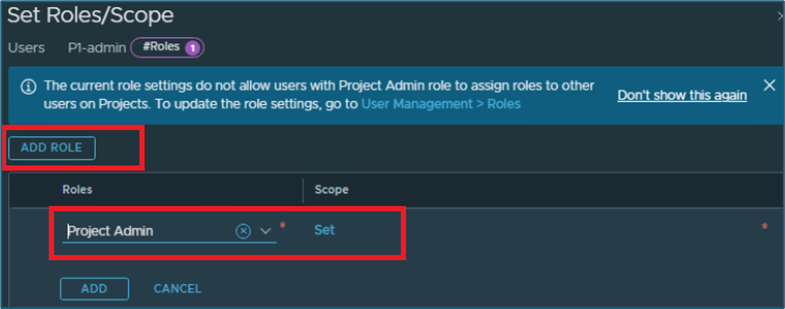
Figure 4 : Assign user role and scope
System will show all project created in your infrastructure. Select project where you want to assign user and then click on APPLY
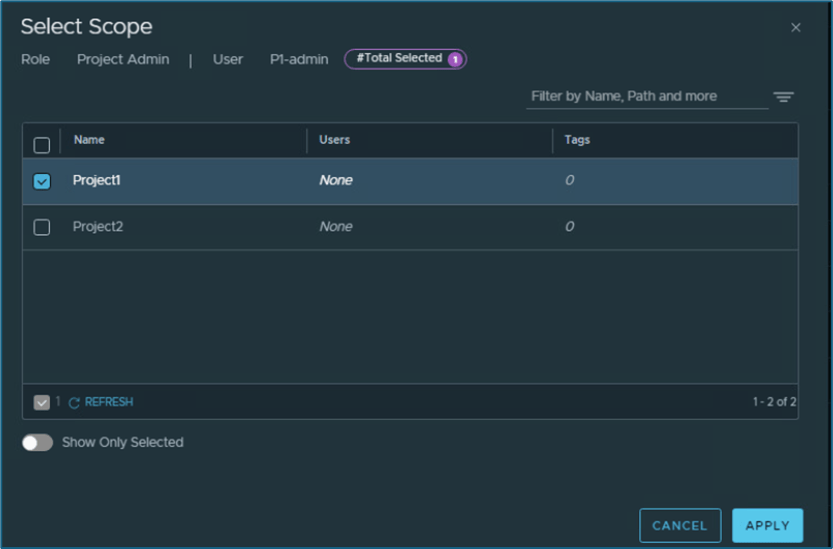
Figure 5 : Map User and Project
Click on ADD to apply configuration and validate that user has been mapped with correct project
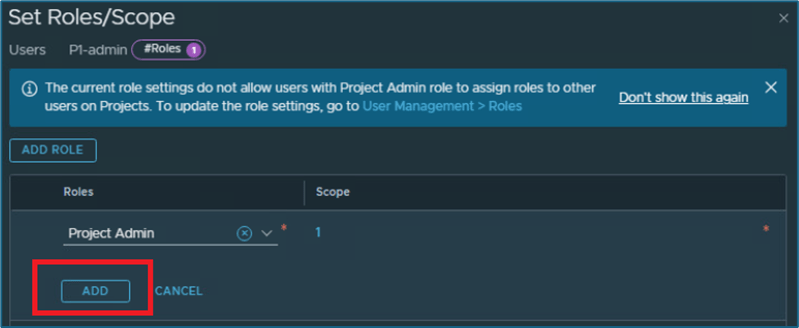
Click on APPLY and then click on SAVE to make changes.
Now validate that user is mapped to project, as per configuration.

Figure 6 : Validate User roles
Now we try another method to assign users to project with Project manage screen. We will assign user P2-admin to project Project-2 with Project-admin role. Please follow below steps to apply changes
Login to NSX-Manager and go to project manage screen. Click on Manage and then click on 3 vertical dots for project where you want to make changes
Click on Edit
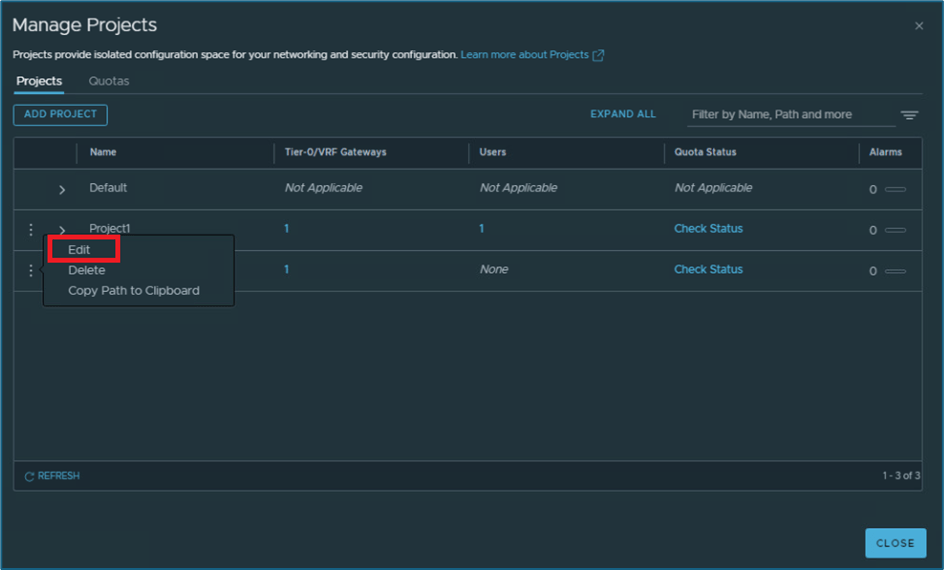
Figure 7 : Assign user to project
Now click on Set under Users option.
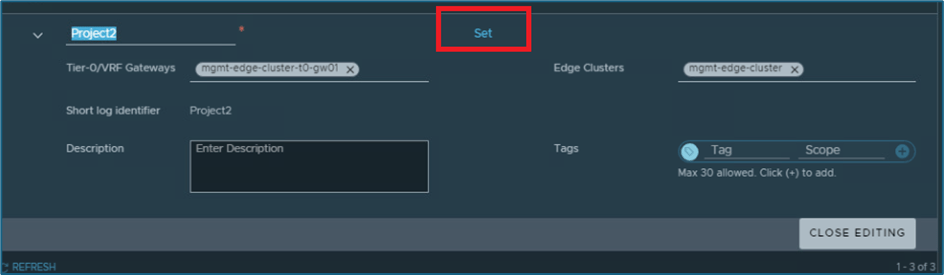
Figure 8 : Click on SET
New window will pop-up. Click on ADD ROLE ASSIGNMENT and then select identity source for user. In our case we are using LOCAL USERS.
Enter user name (P2-admin) and click on SET under Role/Scope
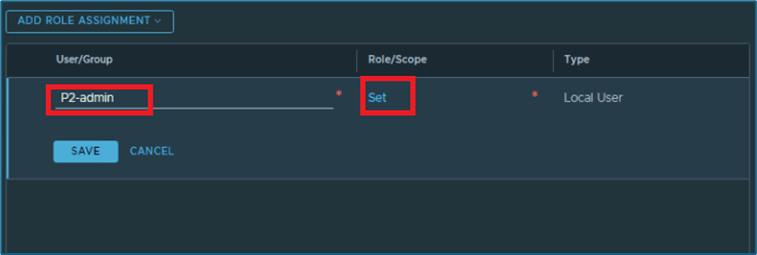
New window will open. Click on ADD ROLE and then select appropriate role from list. In our infrastructure, we will assign project admin role.
Then click on ADD to apply changes
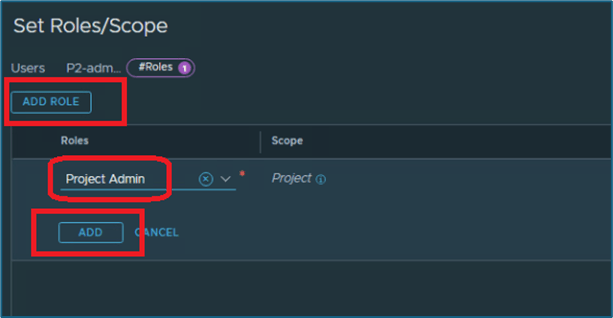
Figure 9 : MAP user role
Apply changes and then click on save to apply configuration.
Now you can validate that P2-admin user also has been mapped to Project2. Please refer below steps to validate.
Login to NSX-T UI >> System >> User Management
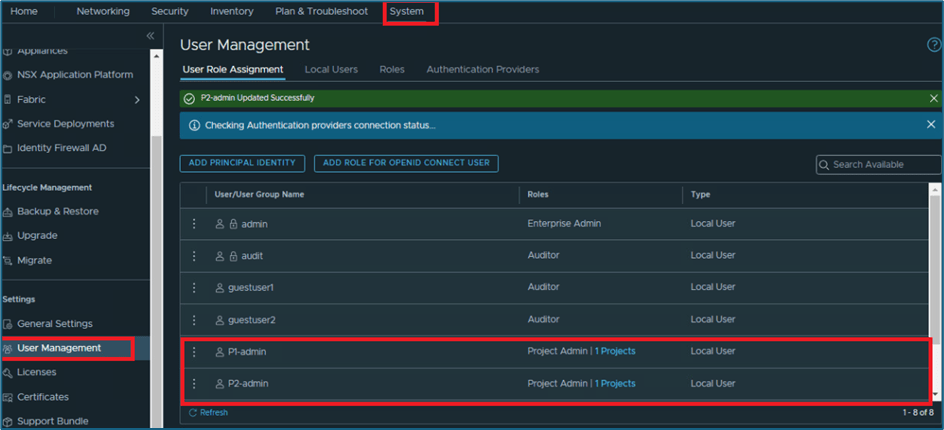
Figure 10 : User role assignment validation
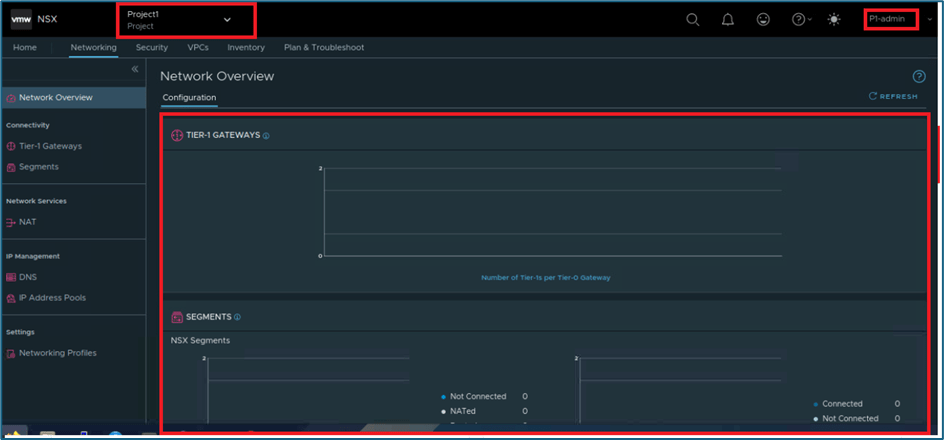
Now back to our topic, Networking in NSX projects. NSX Projects provide isolation with RBAC. User mapped to projects only get access to their project resources and shared objects, if Enterprise admin share.
Please refer below screenshot where we have logged into NSX with project user P1-admin user which is mapped with Project 1 only. Here you can see that User have access to limited resources. In networking Tab, you can validate Project user doesn’t get access to Tier-0 routers.
Note : Enterprise admin can assign Tier-0 router while creating project or later can assign to specific project , as per business requirements.
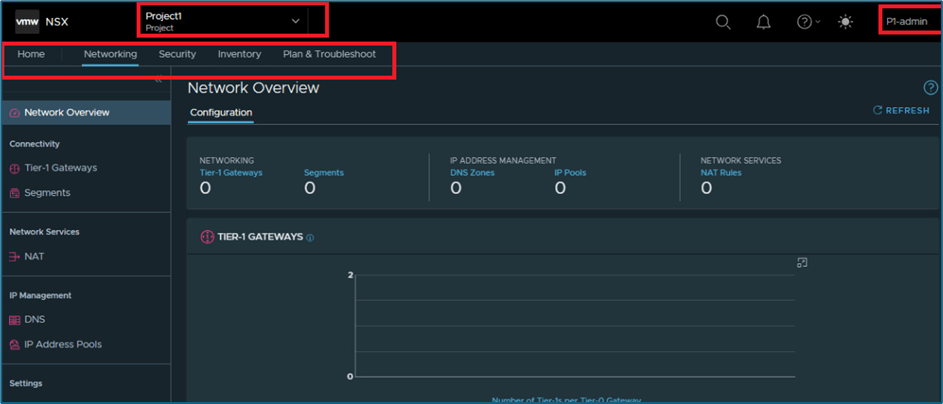
Figure 11 : Project user privilege
NSX Project admin users can create Tier-1 router ,NAT , Segments, DNS , IP-Pools in projects.
If we talk about security tab, Project admin can create Distributed firewall and Gateway firewall (only for Tier-1 routers created in project). Other security features like IDS/IPS are not available in Project.
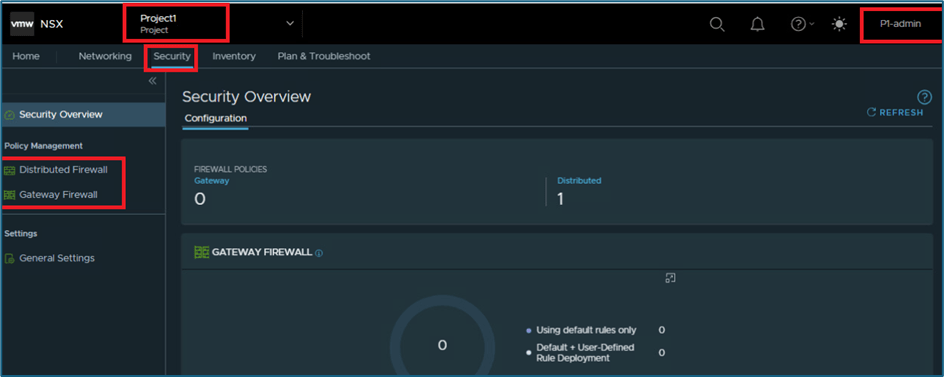
Figure 12 : Security Tab
In Plan & Troubleshoot, User gets only access to trace flow. Other features are not available.
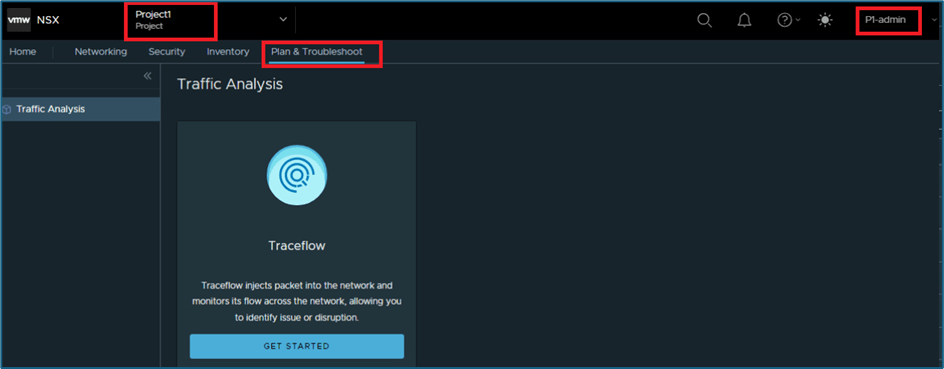
Figure 13 : Plan and troubleshoot for project user
Add routing in NSX Projects
Now we will add tier-1 gateway and segments as per below diagram in Project 1 and later will add configuration for project -2.

Figure 14 : NSX Project subnet details
Enterprise admin assign tier-0 router to project while configuration or later also can be attached to project. Single Tier-0 router can be shared with multiple projects or each project can also have different tier-0 router.
When project user creates Tier-1 router, it doesn’t advertise all routes tier-0 router. Users have to enable configuration at tier-1 router. This configuration can also lead to situations where two project users can configure same subnet on their projects, as they don’t have visibility for other projects.
This issue can be mitigated by route-filtering configuration in NSX project. Enterprise admin configure prefix-lists for project and map those prefix lists with projects.
Let’s go through configuration in our infrastructure.
We have 2 projects which are sharing same Tier-0 router. We will login into both project and try to configure same subnet 10.10.0.0/24 on both projects. We will then validate on Edge router to validate routing configuration.
Note: In our infrastructure,All Projects are sharing same edge cluster. We will get all router instance from same CLI.
Refer below screenshot from enterprise admin console, we have 2 projects and 1 tier-0 router and tier-1 router is not configured
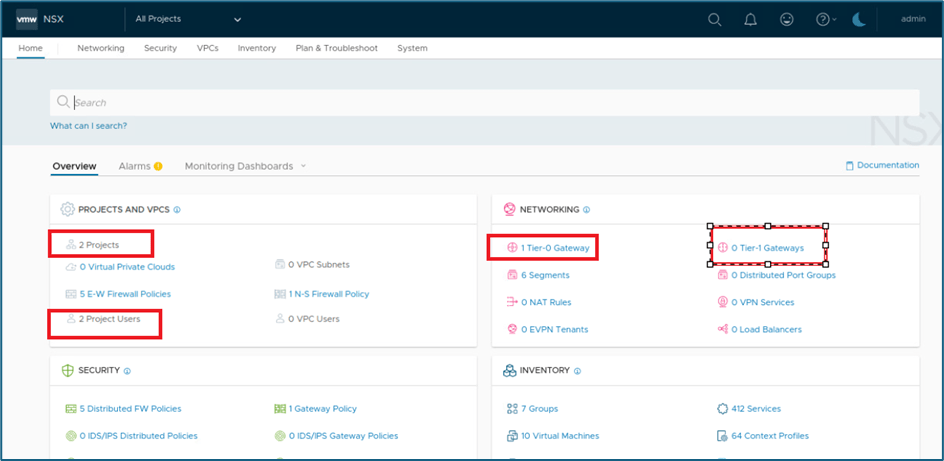
Figure 15 : NSX infrastructure View
We have 2 edge nodes in edge cluster and now we will ssh Edgenode-01a to validate configuration from CLI.

Figure 16 : Edge Nodes details
Refer below screenshot, we have only tier-0 router.

Figure 17 : Edge Node A – SSH
Now login to SR router for tier-0 router to validate routing. Here you can validate we are not getting route for 10.10.0.0/24. We are getting only BGP routes for north bound infrastructure.

Figure 18 : Routing in Tier-0 Router
Now we will login to both Projects (Project 1 & 2) with their project-admin users (P1-admin and P2-admin) to create Tier-1 routers and segments.
We have logged into Project1 and you can refer below screenshot to validate that there is no configuration added
Now we will create Tier-1 router and segment.
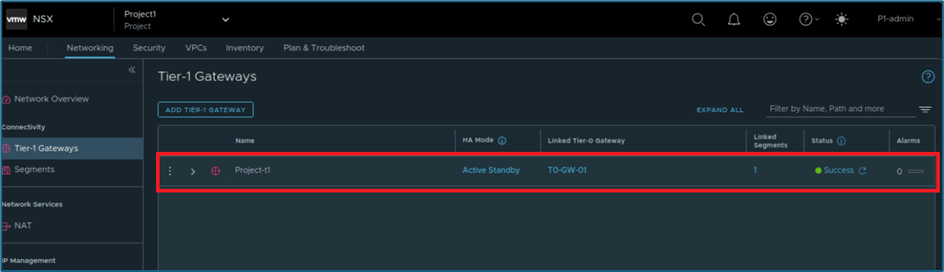
Figure 19 : Tier-1 gateway
In below screenshot, you can validate that segment has been created with subnet 10.10.0.0/24.
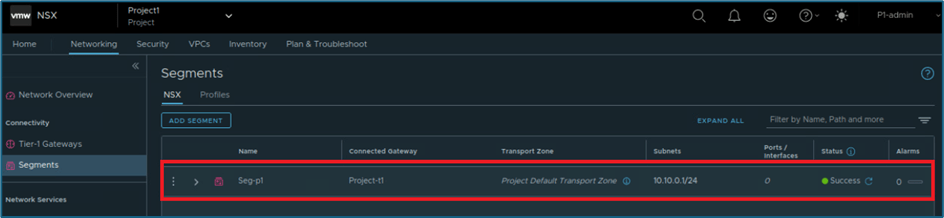
Figure 20 : Segment
Note: Project uses default overlay transport zone and don’t support VLAN backed transport zone in NSX-T.
Now we will validate routing and gateway router from edge CLI. In below screenshot, you can validate that SR & DR routers has been created.

Figure 21 : NSX-T Edge Nodes SR & DR router
Now login to VRF 4 and 1 to validate routing for subnet 10.10.0.0/24. You will be getting routes on Tier-1 SR router but not at Tier-0 router.
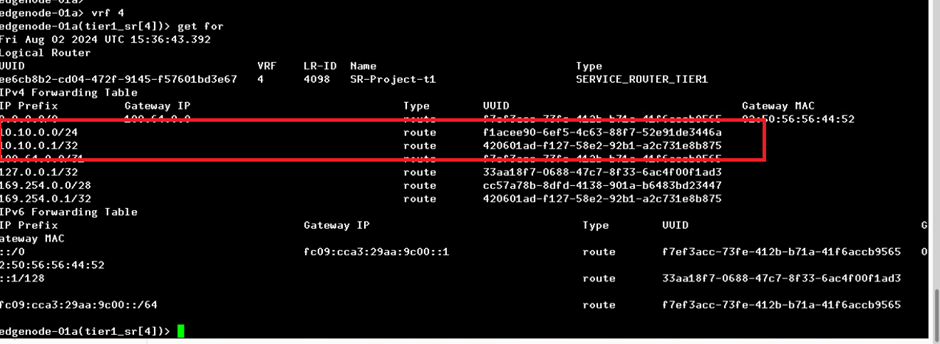
Figure 22 : Tier-1 routing details
Now login to VRF 1 to check routes on Tier-0 router. Here you will not be getting routes
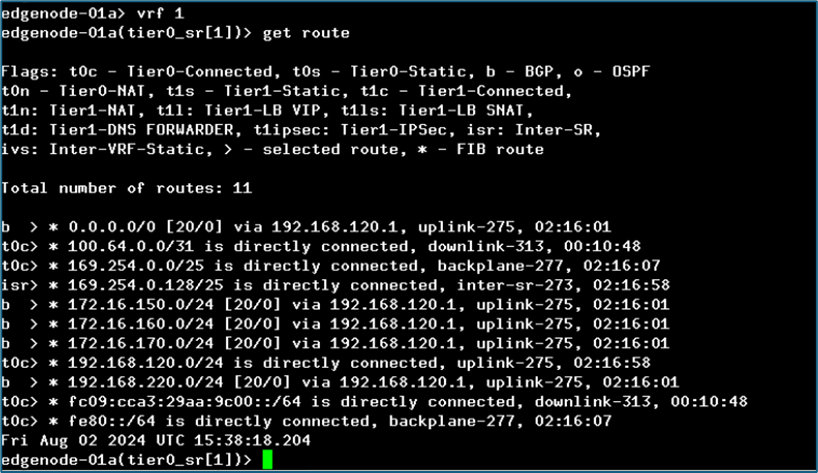
Figure 23 : Tier-0 routing details
Reason for this behaviour is that, Tier-1 router is not advertising routes to tier-0 router. NSX project user have to manually enable this configuration. Please refer below steps
Go to Networking >> Tier1-gateways >> Click on Edit (Tier-1 gateway) >> Expand router-advertisement and then enable All connected segments & service ports.
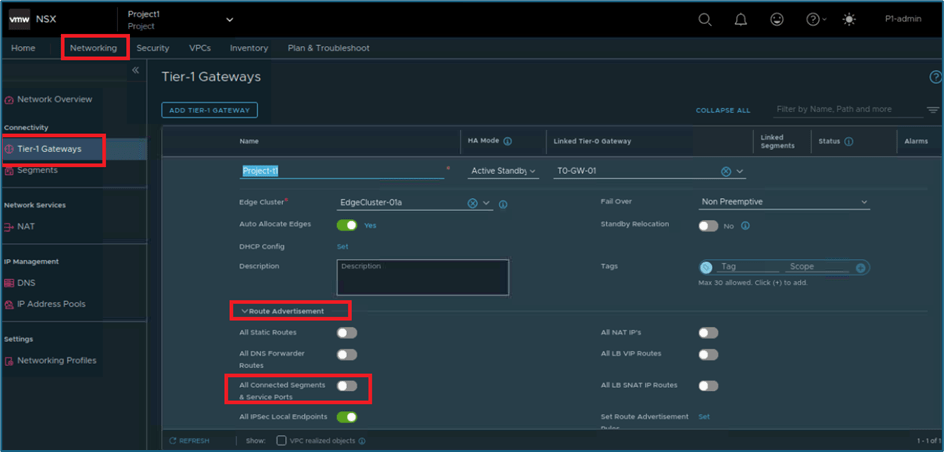
Figure 24 : Enable route advertisement
Click on SAVE and then CLOSE EDITING to apply changes. Now login back to edge node CLI and validate that Tier-0 router is receiving routes as t1c routes.
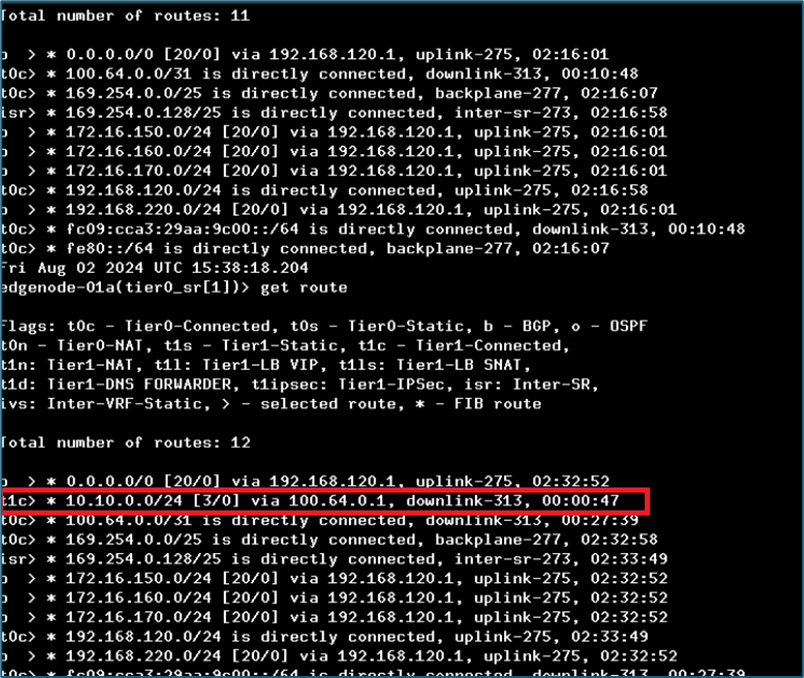
Figure 25 : Tier-0 routing after route advertisement
Now login to Project-2 and apply same kind of configuration as per topology. After applying configuration, login back to Tier-0 router and validate that 10.10.0.0/24 is received from both tier-1 router .
Refer below screenshot to validate that segment configuration in project2.

Figure 26 : Project2 Segment
Now login back to edge node and validate that Tier-0 router is getting two routes for subnet 10.10.0.0/24. This situation occurs if projects are sharing same tier-0 router. Now we will mitigate this issue by route filtering.
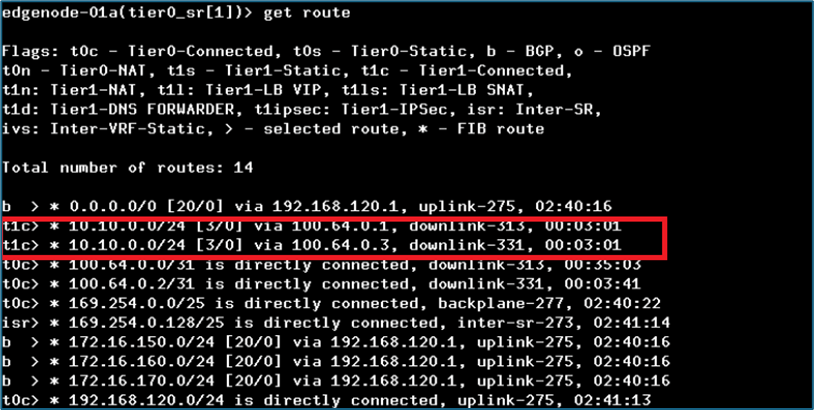
Figure 27 : Tier-0 routing
Route Filtering in NSX Projects
To avoid IP-conflict situation, NSX Projects provides Route filtering feature, which use Prefix lists to control network subnets advertisement. This configuration can be applied from NSX API only and Enterprise admin user role can apply those changes. This configuration can’t overwrite at project level.
In API call, you map prefix list created at default space with projects. Currently NSX UI doesn’t show this mapping configuration. Please refer below high-level workflow to apply filtering
Create Prefix lists with network details which needs to be allowed to advertise from project , in NSX-API interface.
- Read or validate Prefix list configuration
- Create project filter (Map prefix list with Projects )
- Validate Project filter and validate router filtering.
Note : You can refer NSX API guide to find more information.
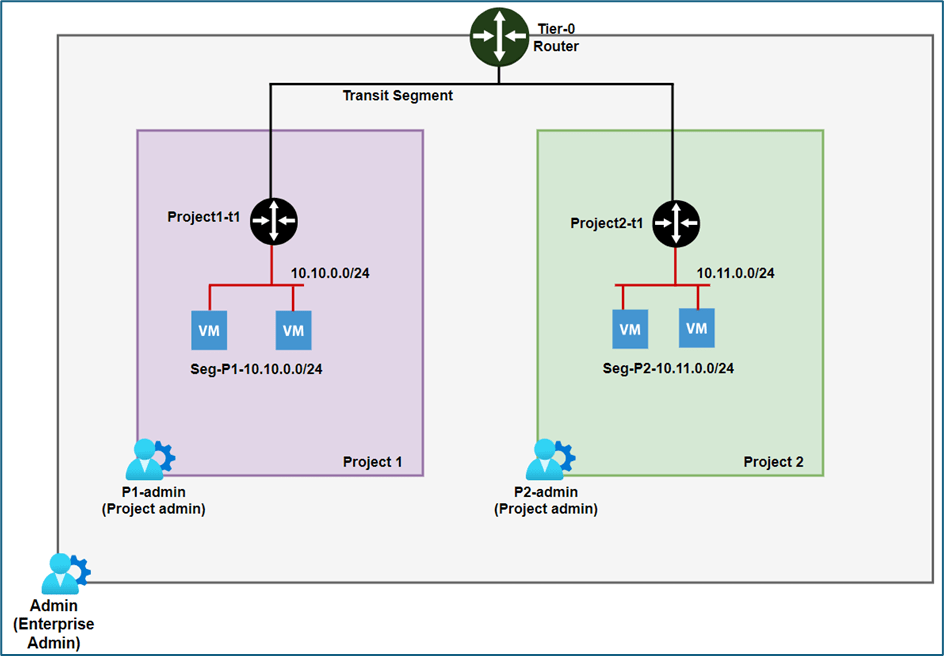
Figure 28 :NSX Logical diagram
In our infrastructure , Project 1 will advertise subnet 10.10.0.0/24 and Project 2 will advertise subnet 10.11.0.0/24, Currently both projects are advertising 10.10.0.0/24 subnet.
Now we will create 2 prefix lists for both projects like Prefix list 1 with subnet 10.10.0.0/24 for project 1 and prefix list 2 with subnet 10.11.0.0/24 for project2 . We will map those prefix lists with respective projects to make appropriate changes.
Step1 : Create Prefix list in NSX
To create prefix list via Postman API, we will use PATCH function . We will create Prefix list Prefix-P1 and Prefix-P2 for both projects respectively.
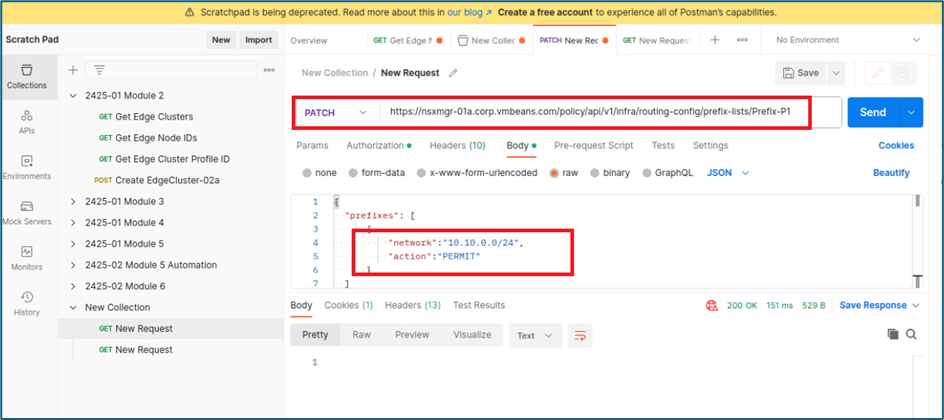
Figure 29 : Prefix list 1
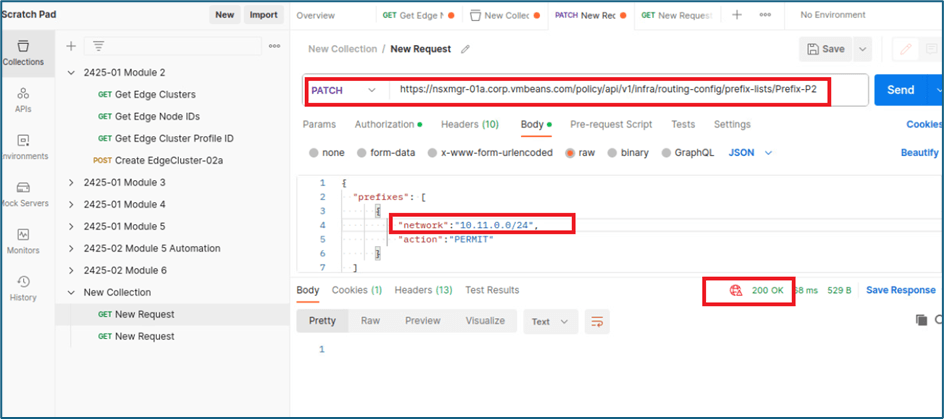
Figure 30 : Prefix list 2
Step 2: Validate that Prefix list has been created
You can validate all prefix list with below API calls in single screen or you can use Prefix list id to validate specific prefix list details.
Note : Prefix list name used in PATCH API will be prefix list id , i.e we have created prefix list Prefix-p1 , so Prefix list id is Prefix-P1. You can refer below screenshot to validate prefix list id
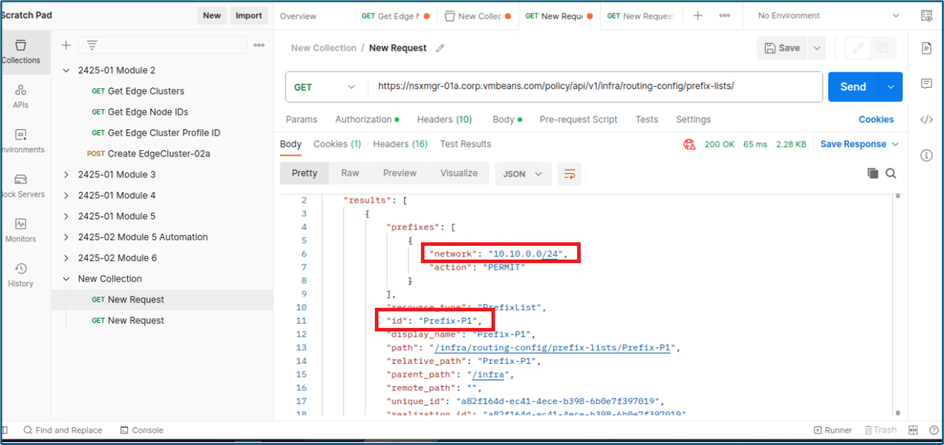
Figure 31 : Validate Prefix list
Step 3 : Create Project filter and map prefix list with Project
We will use PATCH function to create Project filter . Please capture prefix list id which you want to map with project like we will map Prefix-P1 with Project1. We require this Prefix id in Project filter API.
Note : You can map multiple Prefix lists with one project , as per your business requirements.
Refer below screenshot, we have used router filter id filter-p1 in API. We have to provide project information and prefix list in body to apply changes.
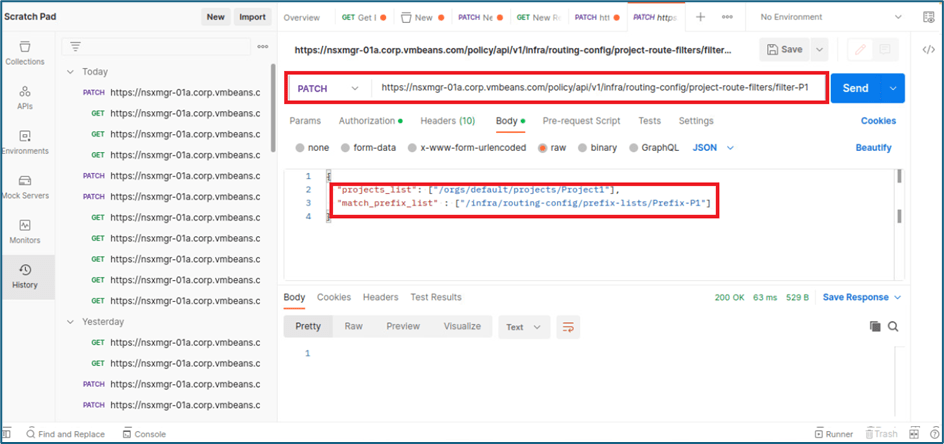
Figure 32 : Project Filter creation
In similar way , we will add project filter for project 2 also where we will use filter id filter-p2 and prefix list prefix-p2
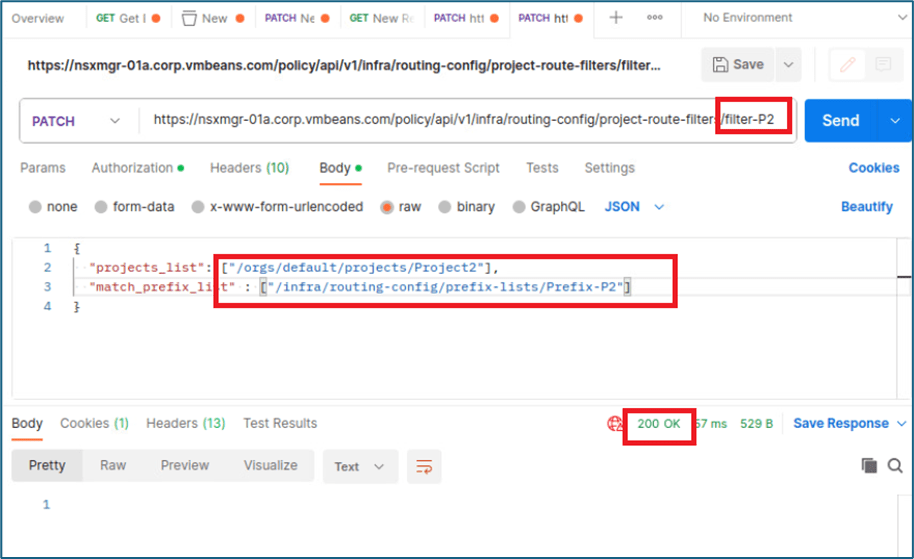
Figure 33 : Project2 filter
Step 4 : Validate project filter and router filtering.
Now we will validate that Project filter has been added in NSX from API and then we will login to NSX-T edge Cli to validate that Tier-0 router is getting subnet 10.10.0.0/24 only from 1 tier-1 gateway.
Refer below screenshot, we have run GET API for router filter filter-P2. We can see this filter is using Prefix list prefix-p2 and following with project details
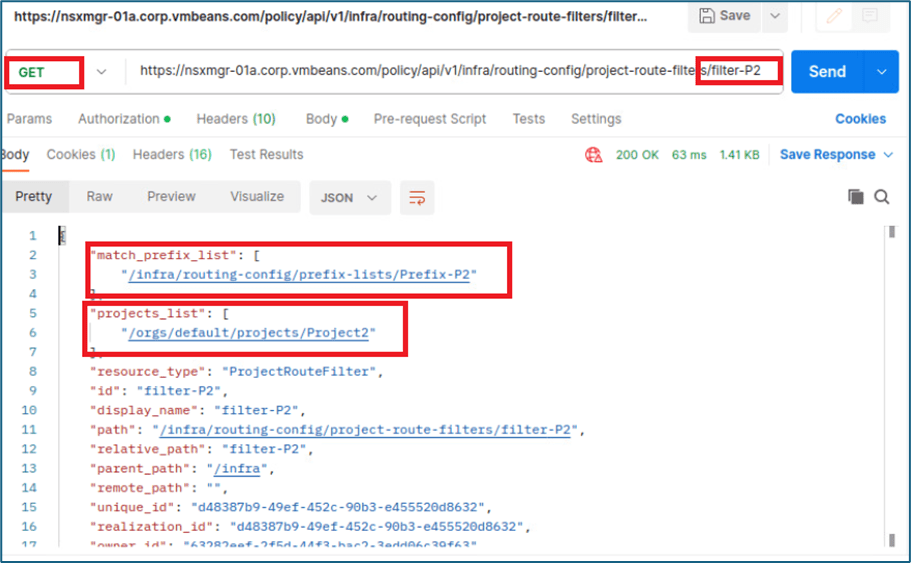
Figure 34 : Validate route filter
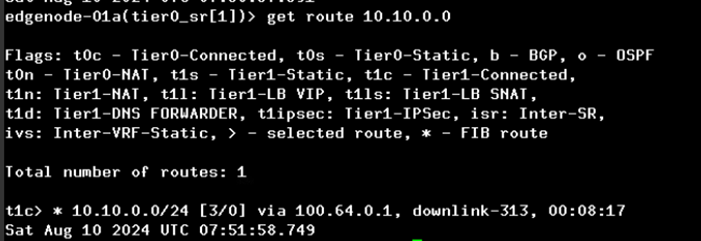
Now we will login to NSX T edge Tier-0 SR router CLI and validate that subnet 10.10.0.0/24 is being received from 1 tier-1 router
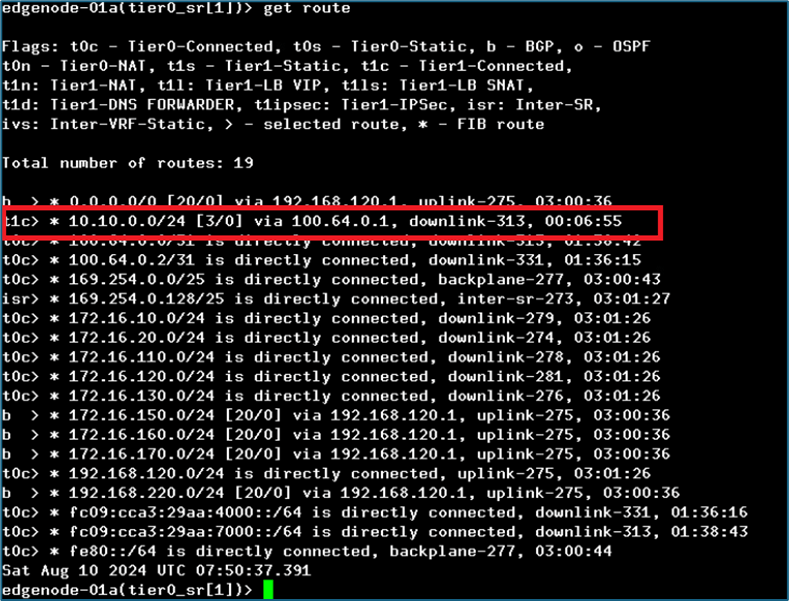
Figure 35 : Tier-0 routing after route filter.
Now we will login to Project 2 and edit segment seg-P2 to advertise subnet 10.11.0.0/24
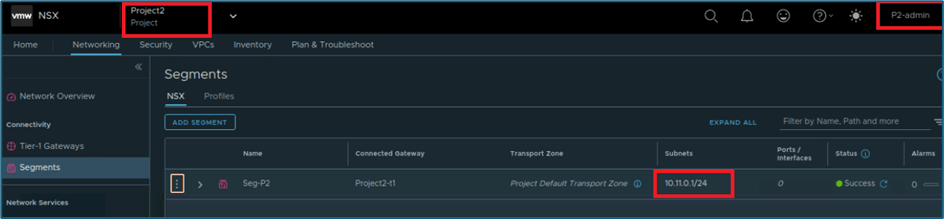
Figure 36 : Project 2 Segment
Now we will validate that Tier-0 SR router is receiving routes for subnet 10.11.0.0/24
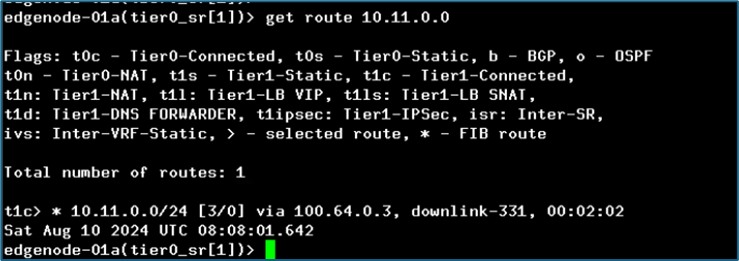
Figure 37 : Tier-0 routing
Conclusion
This concludes our discussion about networking and route filtering in NSX projects. We will cover some more topics about NSX projects and VPC in upcoming blogs.


Leave a comment