In this blog ,we will discuss about Projects in NSX. As mentioned in last blog (Introduction to project and VPC ) , Projects provide isolated management for network and security configurations to Tenants or project admin. Project configuration uses RBAC to restrict project level view and all projects gets created in another director ORG.
This blog will cover all NSX Projects related tasks which includes Add projects, User role , Networking inside Project , Route filtering , etc. Please refer below topology diagram to get more information about topology about NSX projects.
Topology
We will have NSX-T infrastructure with 2 Projects configured Project1 and Project 2 . Each project has 1 Tier-1 router with logical segment attached and 1 VPC configured.
Project1 have user P1-admin with role Project admin and Pv1-admin user with VPC-admin role. Similarly, Project2 have user P2-admin with role Project admin and Pv2-admin user with VPC admin role which are assigned at project and VPC level respectively. Please refer section User roles for more information about Project and VPC users & roles.
Note: In this blog , we will cover only local users instead of LDAP in NSX-T configuration
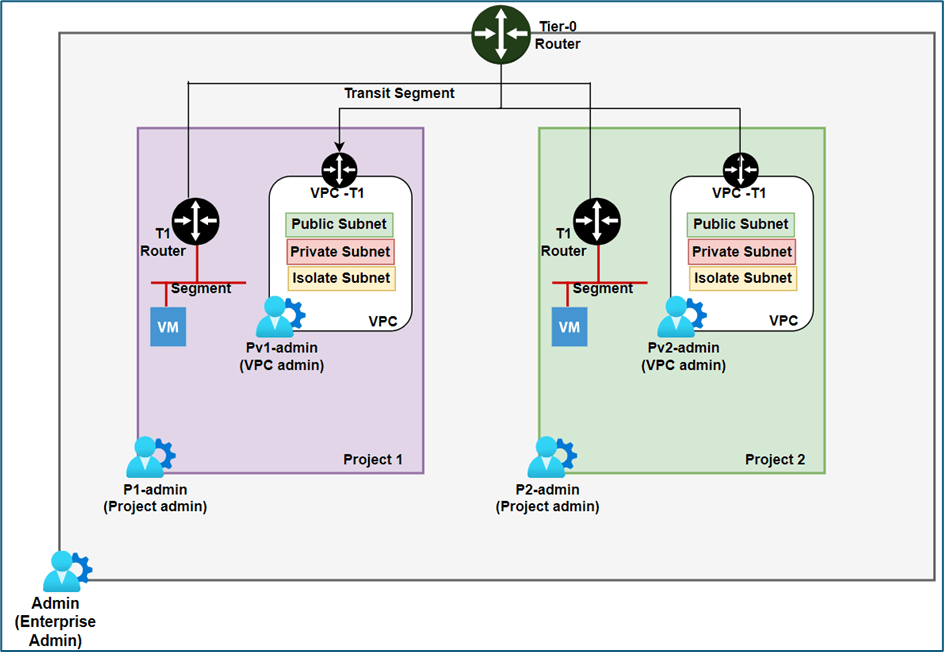
Figure 1 : Topology Diagram
Configure Projects in NSX
In NSX, Enterprise admin users have privilege to create NSX projects. When you login with admin credentials, NSX UI shows default space.
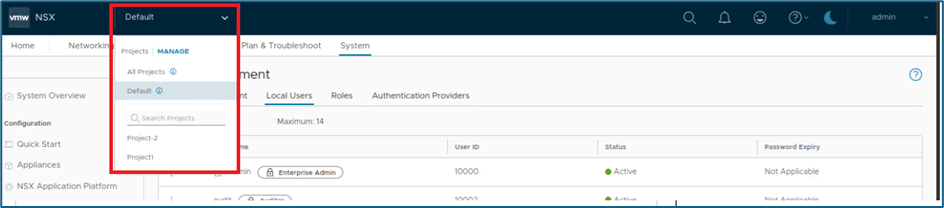
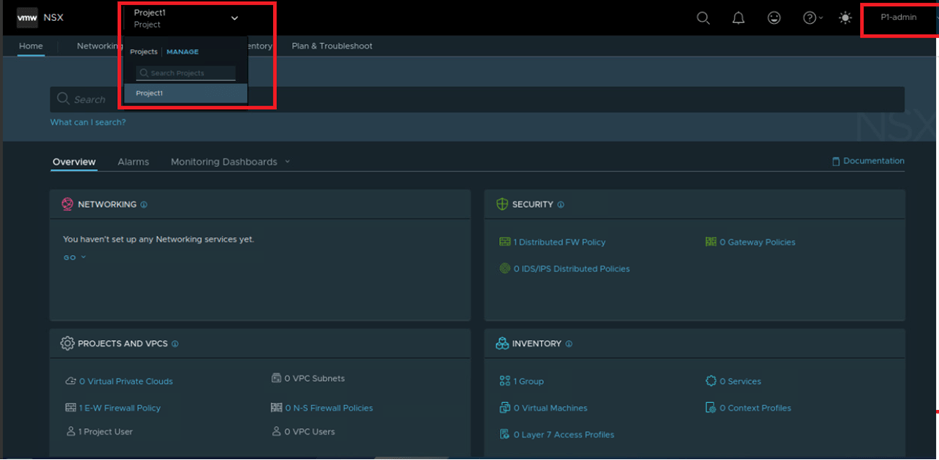
To create Project >>Click on default menu .
Here you will get multiple options: All Projects , Default, Projects: Manage , Search projects.
Let’s discuss about all those options before starting creating new projects. Here we are taking reference of one preconfigured infrastructure where 1 project and VPC is created to explain below options in detail.
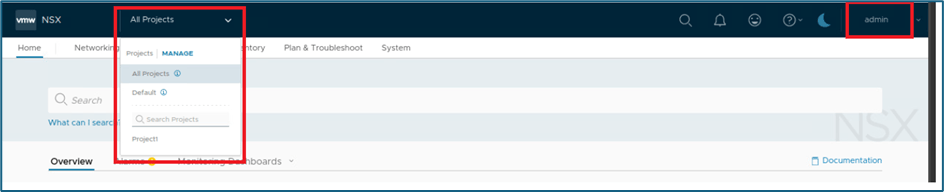
Figure 2 : NSX-T Project Menu
In above screenshot , We are logged in with admin credentials and clicked on Default menu where we are getting below options related to projects.
All Projects : It shows all NSX configuration in single view including projects, VPC and default space . Below screenshot is captured on pre-configured infrastructure where you can validate Projects and VPCs section shows all configuration related to Project and VPC & Networking section contains configurations for all projects and default space.
Security sections show all configuration for Projects and default space.

Figure 3 : NSX All Projects screen View
You can validate all configuration by clicking on specific tabs .
Default: This shows all configuration of default space which doesn’t contain configuration about Projects and VPC. In our below screenshot, you can validate Project and VPC configuration tab has been hidden and configuration specific to Project is also not visible in Network & security section.
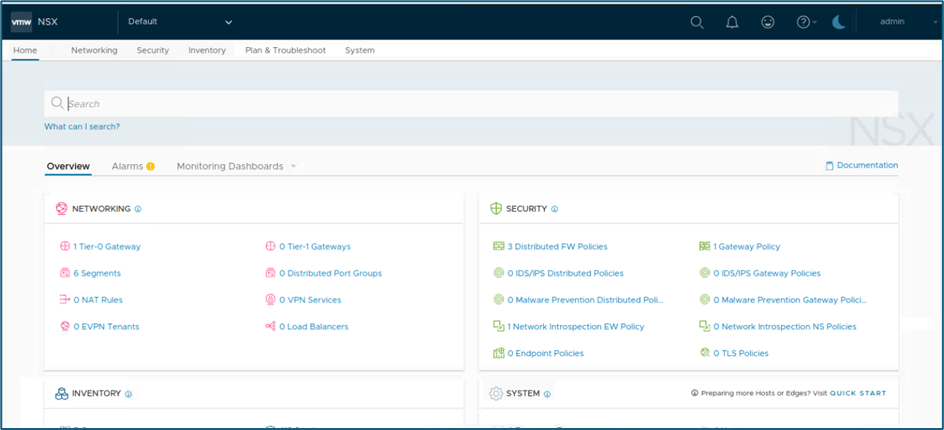
Figure 4: NSX Default space view
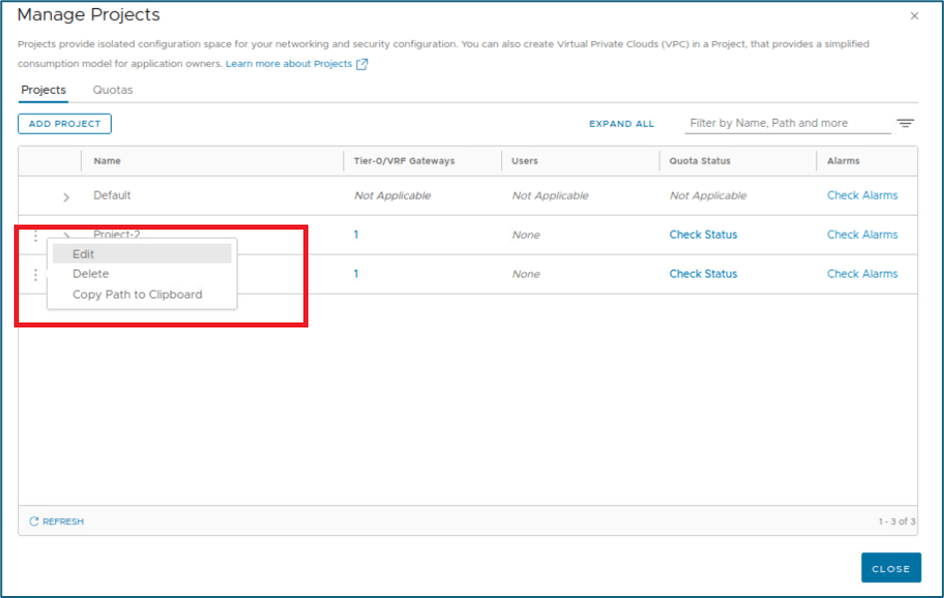
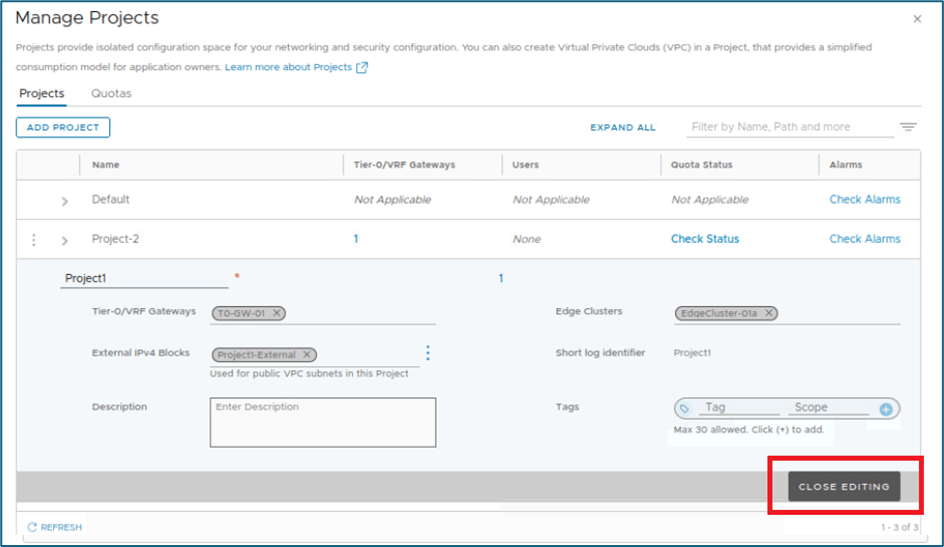
Project:Manage: This option provide feature to create new project or edit existing project configuration. After clicking on this option another window will pop-up (Refer below screenshot) where We can apply configuration related to Projects and Quotas.
Here we get list of all configured projects like in our reference infrastructure Project1 is already created.
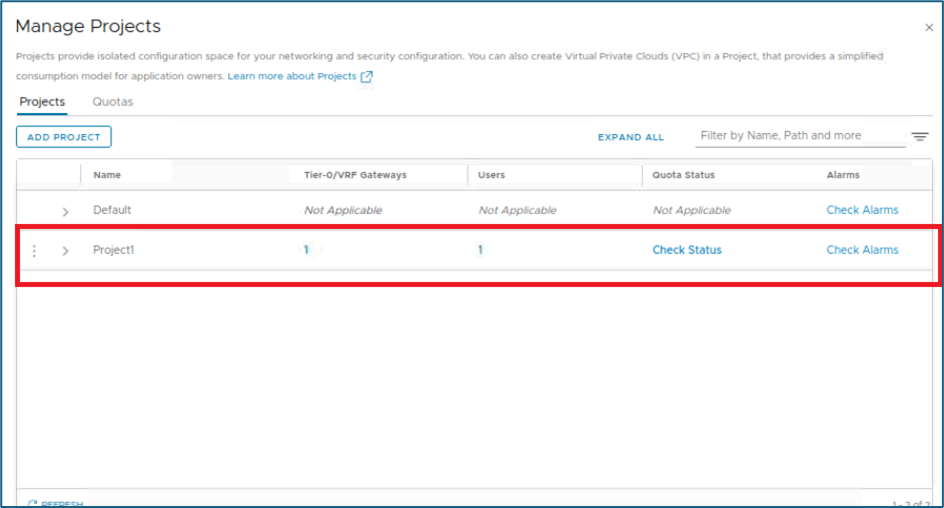
Figure 5 : Manage Project screen.
To create project, Click on Add project and below window will appear. Prior to create project, it is recommended to plan & configure Users (Project admin, VPC admin ,etc.), Tier-0 , Edge clusters , External IPv4 blocks configuration.
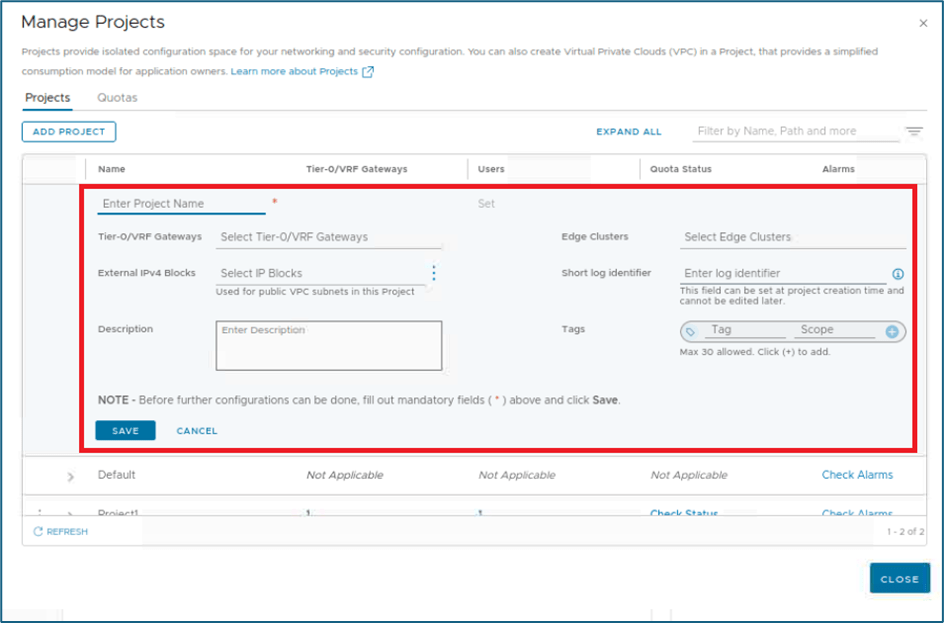
Figure 6 : Add project configuration.
Please find more information about all configuration parameters while creating new project section.
Name : While creating Projects in NSX, Project Name is mandatory. Other Parameters can be skipped while creating project and can be configured later by enterprise admin.
Note: NSX allows to modify project name later.
Tier0/VRF Gateway: Select Tier-0 or VRF gateway to establish North-South connectivity with outside world for workloads in Projects. If you don’t need outside connectivity, then Skip this configuration. One Tier-o or VRF gateway can be shared with multiple projects.
Edge Clusters: Select Edge cluster if you plan to create any stateful service like NAT , Gateway firewall ,etc inside project. It is not mandatory to assign Tier-0 Edge cluster to Project. You can assign different edge clusters also to Project.
You can Skip this configuration if you don’t want to apply any stateful service or only need Distributed router for Project Tier-1 router.
Edge clusters can be shared with multiple project and clusters which are associated with default transport zone of system are supported in project.
External IPv4 blocks: External IPv4 blocks will be used while creating Public subnets in NSX VPC configuration. System will provide public subnets CIDR from those External IPv4 blocks when user request for public subnet inside VPC.
NSX create one SNAT rule for private subnet from this external block/public subnet while creating any private subnet inside VPC.
Apart from this user can use those external blocks to use NAT inside VPC configuration.
Note: We can configure maximum of 5 External IPv4 blocks in project and those should not be overlap with another project which are sharing same Tier-0 routers. From NSX 4.1.1 more than 1 block can be selected while creating project. You can create External IPv4 blocks while creating new project.
Short log identifier: Short log identifier can be used to identify logs related to projects and it is applied to security and audit logs. The short log identifier must be unique across all NSX projects.
Note: Short log identifier must not be exceed 8 alphanumeric characters. If you don’t specify while configuration, system will autogenerate when you click on save to project.
NSX will use project name as short log identifier if project name is less than 8 characters and assign some random alphanumeric value, if project name is larger than 8 characters.
Refer below example we have 2 projects created project 2 and projecttest. NSX have used short identifier Project 2 and 52xp8Tic (random number) for project 2 and projecttest respectively.

Figure 7: Project1 Shortlog identifier

Figure 8 : Project 2 Short log identifier
You can also add description & tags while creating project.
Now let’s create Projects as per our topology diagram. We have to create 2 Projects and assign project admin roles to user id P1-admin and P2-admin. VPC admin role assignment we will perform in VPC section.
Pre-requisite
Before creating Projects, we will validate NSX-T Users, Networking (Tier-0 router and edge clusters) are already created.
Note : We have all users and Tier-0 router & Edge cluster is already created in our environment.
Please find below screenshot for local users which will be used.
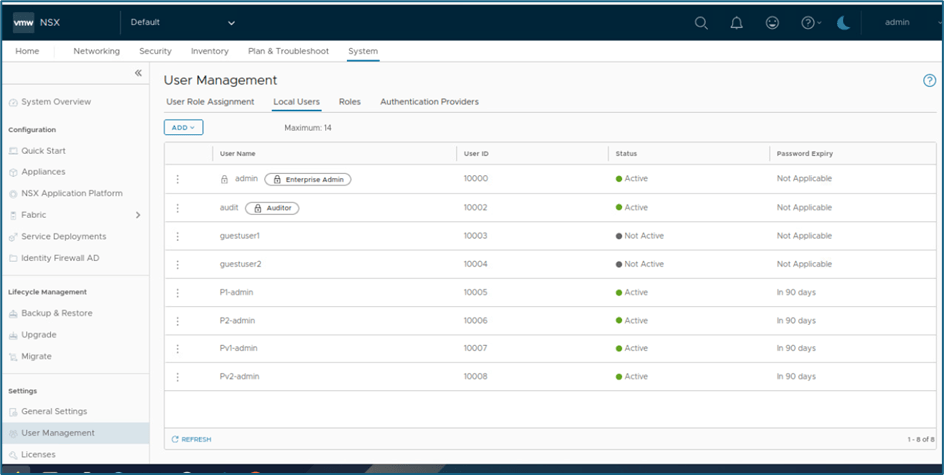
Figure 9 : NSX Local user
Click on System >> Nodes >> Edge clusters to validate Edge cluuster.
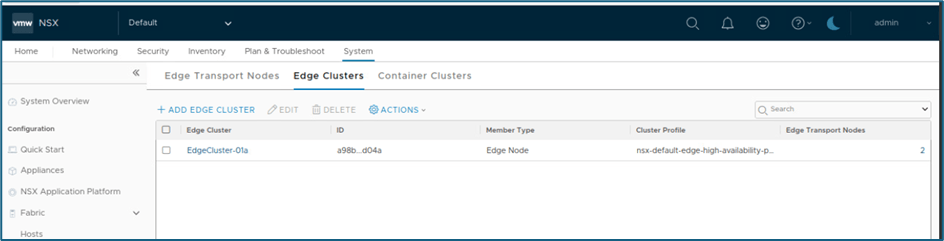
Figure 10 : NSX Edge Cluster
Click on Networking >> Tier-0 to validate Tier-0 Configuration.
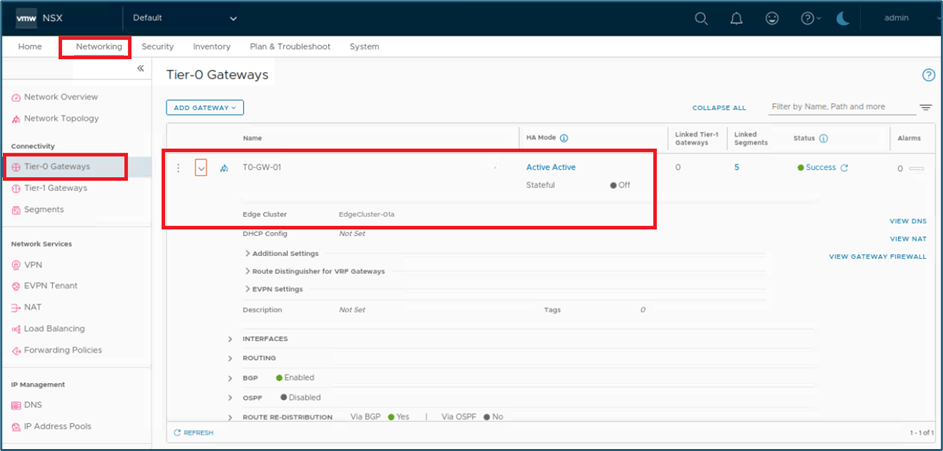
Figure 11 : NSX Tier-0 Configuration
Now validate that there is no project configured. Login to NSX UI with enterprise admin user (admin) and click on Default space (refer below scrrenshot)

NSX-T Project Configuration
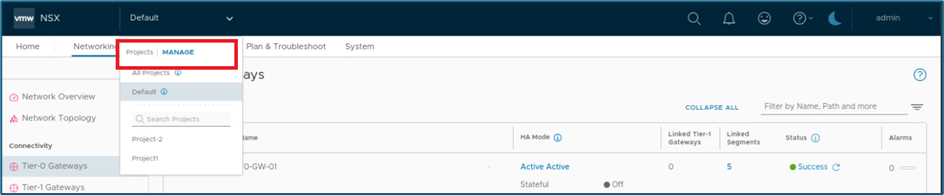
Click on Manage and new window will pop-up to create new project. Click on Add Project.
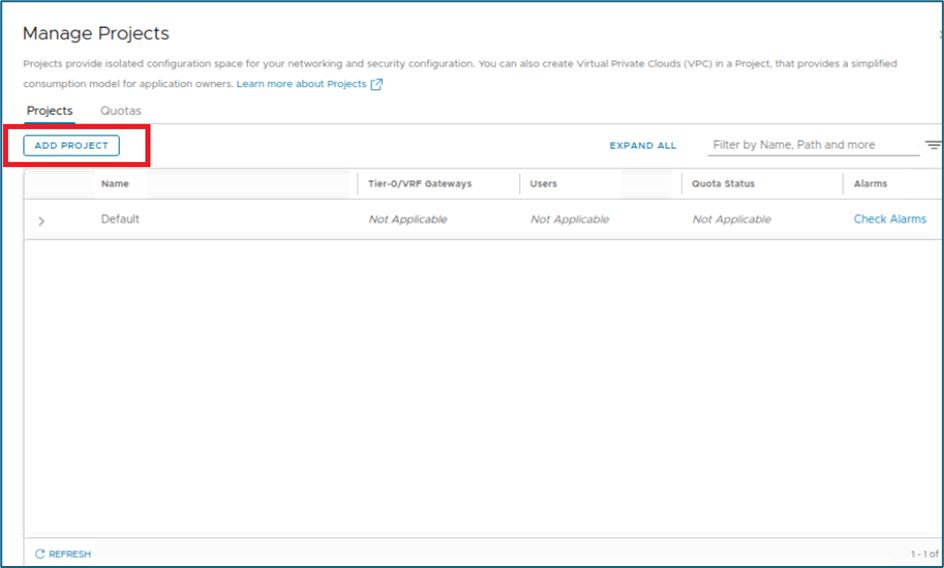
Figure 12 : Click on ADD PROJECT
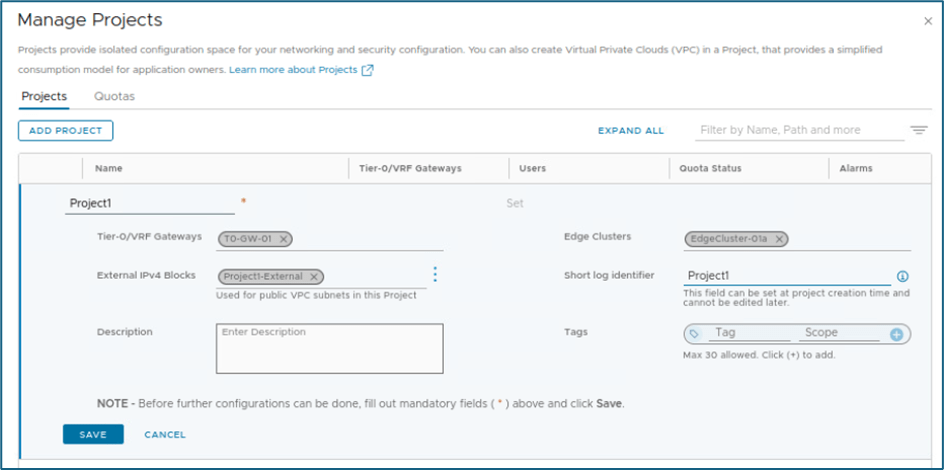
Enter Project Name , Select Tier-0.VRF gateway & Edge Clusters. We don’t have any External Ipv4 block configured.
Note: Tier-0 Gateway and Edge Clusters is created in default space which we have seen in pre-requisite section.
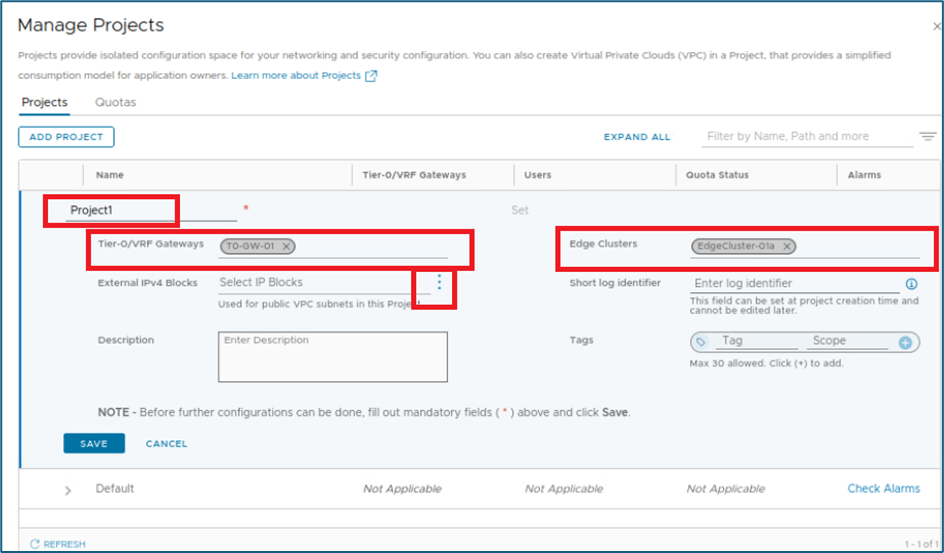
Figure 13 : Project Creation
Click on 3 vertical dots in external Ipv4 blocks and click on create new to add External IPV4 block configuration.
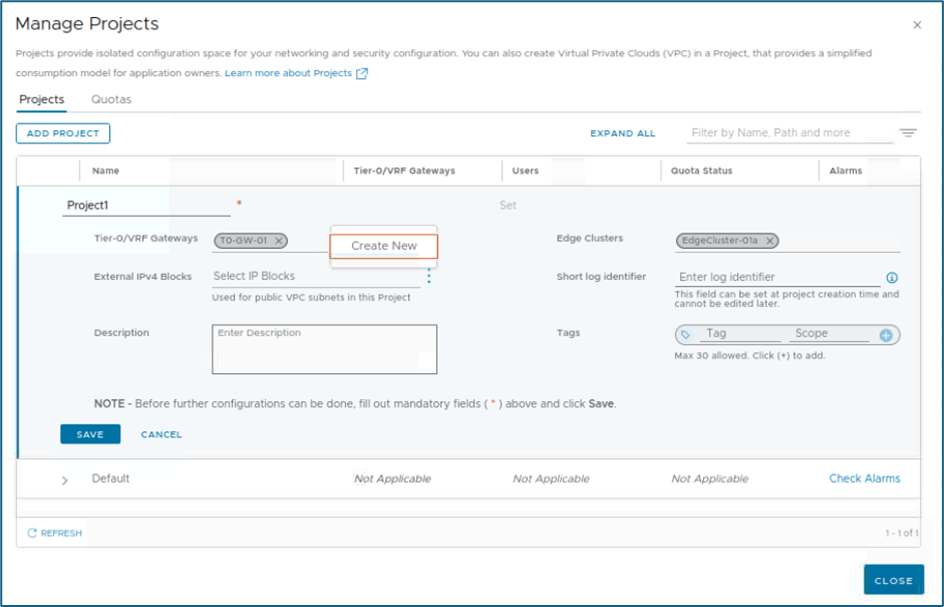
Figure 14 : Click on create new
New Window will pop-up where you have to add details about External subnet. In this blog for project 1 we are using 11.11.11.0/24 and for Project 2 22.22.22.0/24.
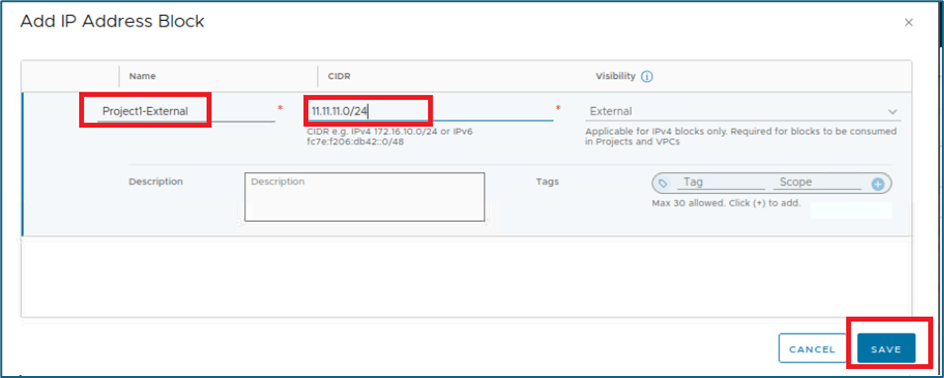
Figure 15 : External IPv4 block
We have added Short log identifier as Project 1. Click on save to create project
System will prompt to add further project configuration. Here we will click on No as we will edit configuration later. If you want to add user to project or edit any other configuration then click on Yes.
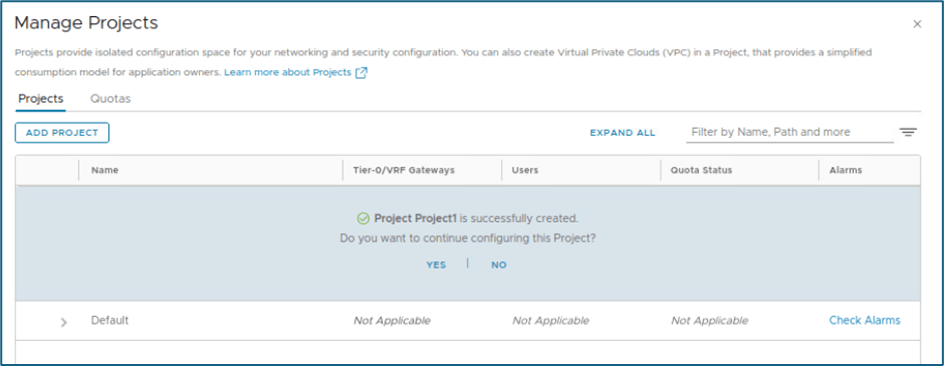
Figure 16 : Project Configuration
You can validate that Project1 has been created. In same way you can create Project2 .
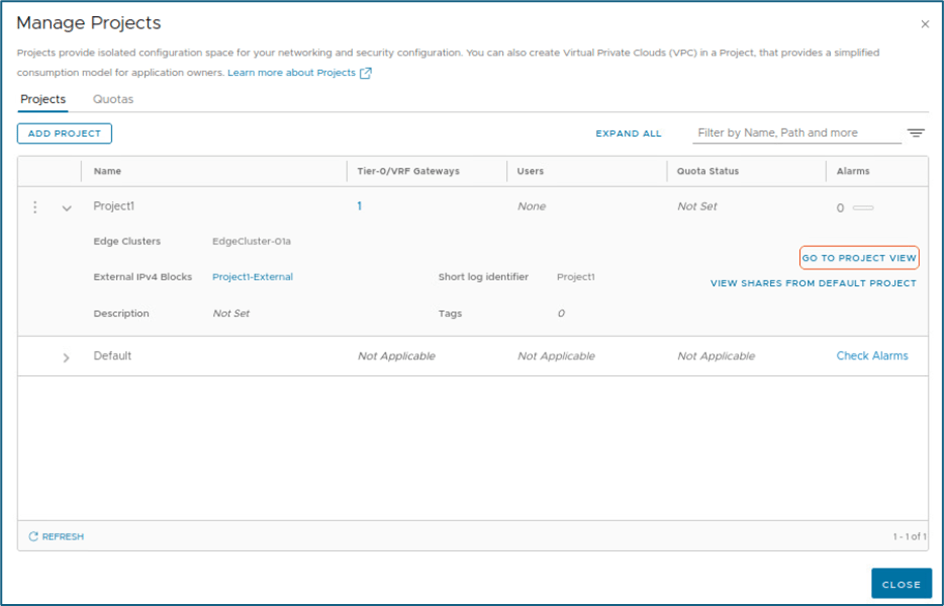
Figure 17 : Project validation
In below screenshot, you can validate that we have created 2 projects
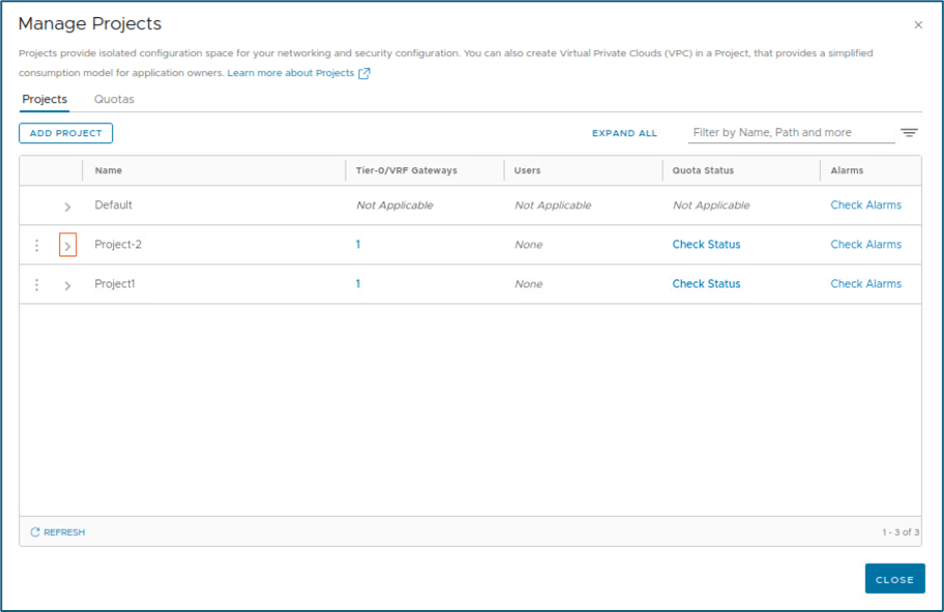
Now if you again click on Default menu , both projects will be appeared. You can click on project to get project specific view as system wide users roles like enterprise admin , Auditor have access for all projects.
Note: External IPv4 blocks which we created while projects creation workflow are created in default space. To validate, click on Networking >> IP address Pool >> IP address block.
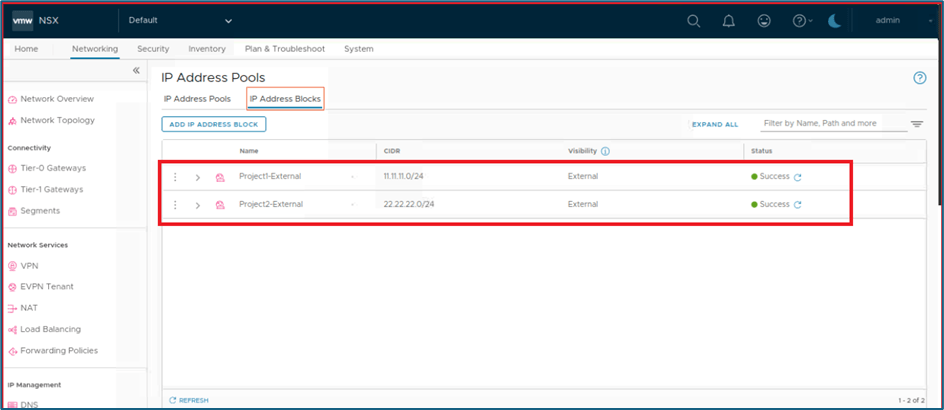
Figure 18 : External IPv4 block in default space
User roles assignment for projects
Enterprise admin have to assign users to project with specified roles like project admin.
NSX 4.1.1 supported identity sources Local, LDAP and VIDM. Please refer below screenshot. Please refer NSX config max to validate change in configuration in new NSX versions.

Figure 19 : Identity Source for NSX Project
To Assign users to project , login NSX UI with enterprise admin credentials and go to manage projects tabs.
Now click on 3 Vertical dots of project for which you want to assign user roles
Click on set to add user to Project.
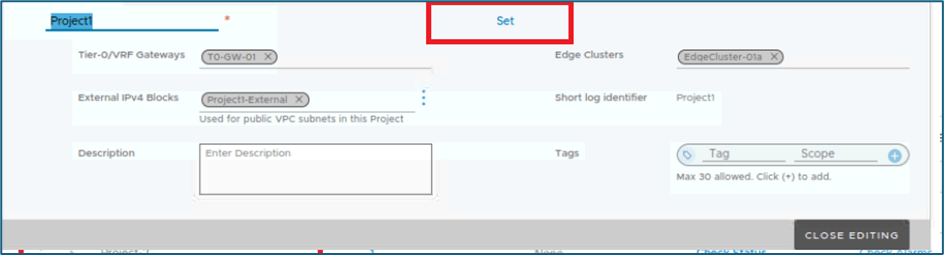
Figure 20: Click on Set
In Next screen , select identity source . In this blog we are using Local credentials. Select Local users.
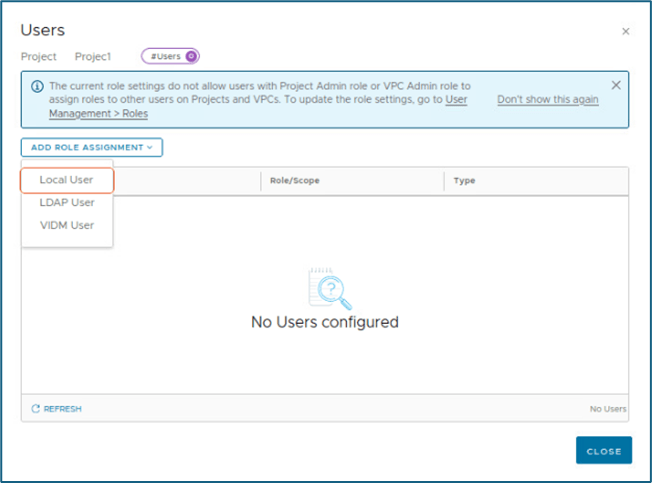
Figure 21: Click on Local User
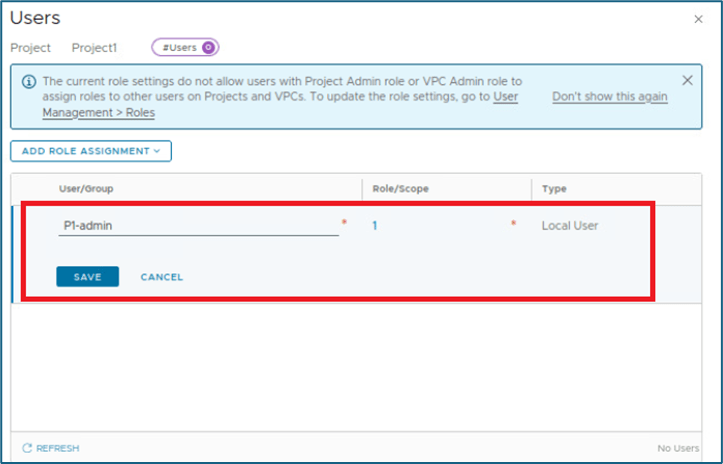
In next screen , enter User name which you want to assign and click on SET to assign specific role.

Figure 22: User and Role Mapping
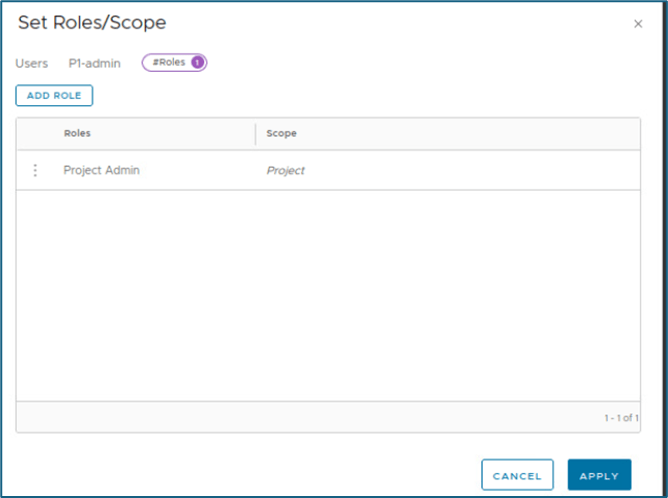
NSX Projects provide below user roles which are configured at system level. You can assign roles as per business requirement. Here we will select project-admin.
You can refer NSX documentation to find more details about those role privilege.

Figure 23 : User Roles
Click on Apply to save configuration.
Now system wiil go back to previous screen . Here click on save to map user and role configuration
System will validate user configuration and apply , if user exist else error will occur. Now validate that user has ben assigned to project with specified role.
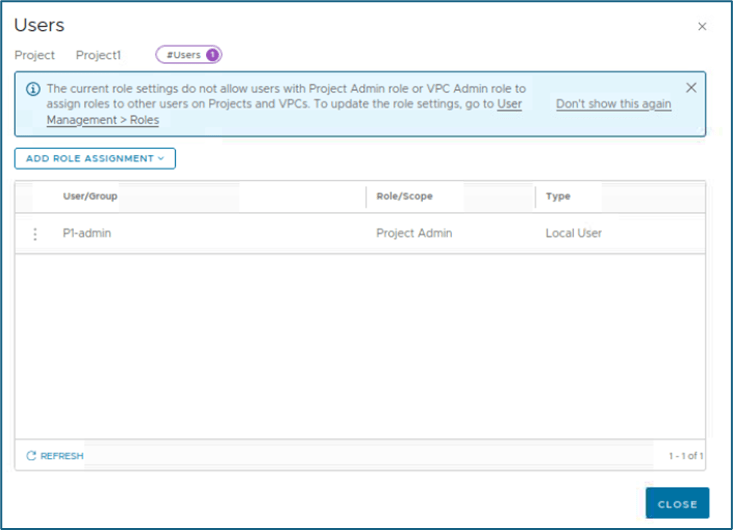
Figure 24 : User configuration validation.
Click on close edition to save configuration at NSX system level.
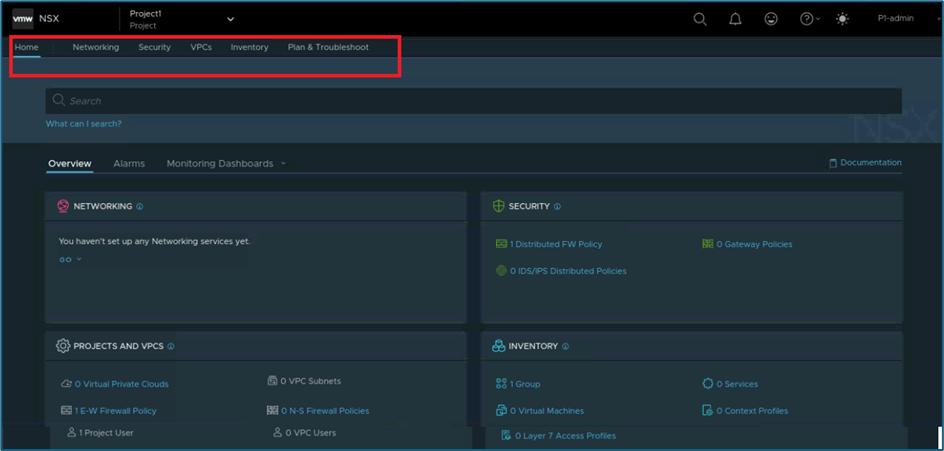
Now we will validate applied configuration. We have logged in NSX-T UI with user P1-admin which have project-admin and assigned to Project-1.
Here you can validate that this user have access only to project specific configuration only and user is not having access to Tier-0 router. Apart from that system Tab is not available for Project user.
New Tab VPC is visible to project-admin user. We will discuss VPC in detail later.
Conclusion
This ends our NSX Project part 1 blogs where we discussed about project creation and User role assignment in details . We will come with upcoming blogs with other parameter like Quotas , Routing within project , Route filtering , security ,etc.


Leave a comment